In this tutorial we cover the following topics
- General information
- Step 1: create a new project
- Step 2: replace
UIViewControllerwithUINavigationController - Step 3: replace
UITableViewControllerwithUIViewControlers - Step 4: add first nonroot view controller
- Step 5: run the application
- Step 6: passing data from root view to first view
- Step 7: run the applicationd
- Step 8: add programmatically a second view controller
- Step 9: run the application
- Step 10: add programmatically an infinite numer of view controllers
- Step 11: run the application
The main tool we use to build hierarchical applications for iPhone is UINavigationController. UINavigationController is similar to UITabBarController in that it manages, and swaps in and out, multiple content views. The main difference between the two is that UINavigationController is implemented as a stack, which makes it well suited to working exactly with hierarchies.
A navigation controller maintains a stack of view controllers. When we design our navigation controller, we need to specify the very first view the user sees. That view’s controller is called the root view controller, or simply root controller, and is the base of the navigation controller’s stack of view controllers. As the user selects the next view to display, a new view controller is pushed onto the stack, and the view it controls appears. We refer to these new view controllers as subcontrollers.
While the navigation controller is really the heart and soul of many iPhone apps, when it comes to iPad apps, the navigation controller plays a more marginal role. A typical example of this is the Mail app, which features a hierarchical navigation controller to let users navigate among all their mail servers, folders, and messages. In the iPad version of Mail, the navigation controller never fills the screen, but appears either as a sidebar or a temporary view covering part of the main view.
Xcode offers a perfectly good template for creating navigation-based applications, and in practise we will use it whenever we need to create hierarchical applications. However, in this tutorial we are not going to use that template. Instead, we will construct our navigation-based application from the ground up, so we get a feel for how everything fits together.
- Step 1: create a new project
Create a new project- Select File | New | Project...
- Select Single View Application on the template selection sheet.
- As the product name enter
Swift iOS Navigation Controller - Set the Language to Swift. Because we will not use tests in this tutorial, you can leave both test check boxes unchecked as well as make sure the check box labeled Use Core Data is also unchecked.
- Select
Main.storyboard. - Select the view controller in either the editor area or the Document Outline and delete it to leave the storyboard empty.
- Find
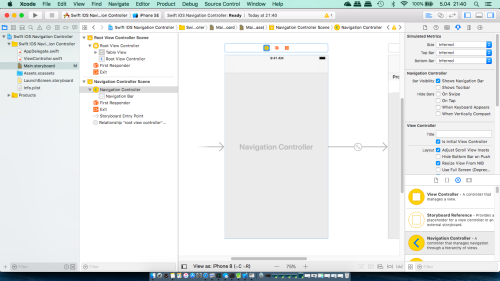
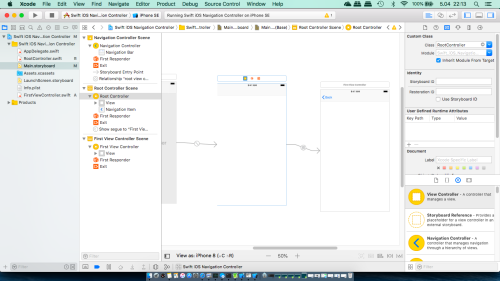
Navigation Controllerin the Object Library and drag an instance into the editing area. Notice that we get two scenes instead of one - similarly to tab view controller in previous part. On the left is theUINavigationControlleritself. TheUINavigationControllerhas a connection wired to the second scene, which contains aUITableViewController. As you can see the table has the title Root View Controller. Table view controller seems to be resonable starting point when disply hierarchical data.
- Select
UINavigationController, open the Attributes Inspector, and check Is Initial View Controller in the View Controller section to make this controller the controller that appears when the application is launched
- Step 3: replace
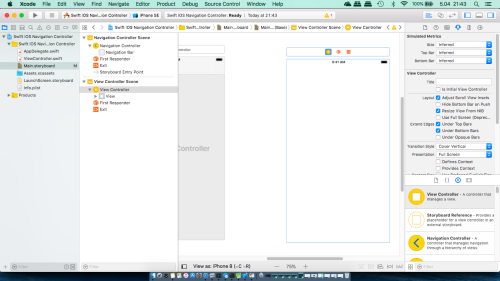
UITableViewControllerwithUIViewControlers- Delete
UITableViewController. - Add new
ViewController. - Control-click Navigation Controller and drag to the view controller we have just added and select root view controller from popup menu.
Notice that view controller which has been added is also equipped with Navigation item to perform correct navigation to/from other views.
- Select
ViewController.swiftin the Project Navigator. - In the editor area double-click the class name and then right-click it.
- In the menu that appears, select Refactor | Rename....
- The dialog should appear - change the view controller name to
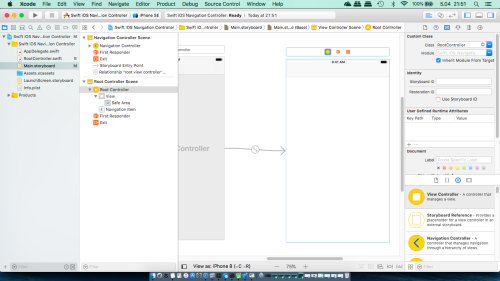
RootController. - Single-click the yellow View Controller icon in the row of icons at the top of the View Controller Scene. Next press Alt+Command+3 to bring up the Identity Inspector. In the Custom Class section as Class select RootController.
- Open
RootController.swiftfile and add/modify12345override func viewDidLoad() {super.viewDidLoad()// Do any additional setup after loading the view, typically from a nib.self.navigationItem.title = "Root View";} - When executed, Root View title should be visible on a screen
- Delete
- Step 4: add first nonroot view controller
- In the Project Navigator, right-click the Swift iOS Navigation Controller group and select New File....
- Choose Cocoa Touch Class from the iOS Source section in the template dialog and then press Next.
- Name the new class
FirstViewController, make it a subclass ofUIViewController. Because we are going to add this controller to the storyboard later manually, so make sure that the Also create XIB file check box is not checked. - Press Next and then press Create to save the files for the new view controller.
- Find
View Controllerin the Object Library and drag an instance into the editing area.
- Single-click the yellow View Controller icon in the row of icons at the top of the View Controller Scene. Next press Alt+Command+3 to bring up the Identity Inspector. In the Custom Class section as Class select FirstViewController.
-
Now we have two options:
- First: Single-click the yellow View Controller icon in the row of icons at the top of the Root Controller Scene and drag to the view controller we have just added and select Manual Segue | Show from popup menu.
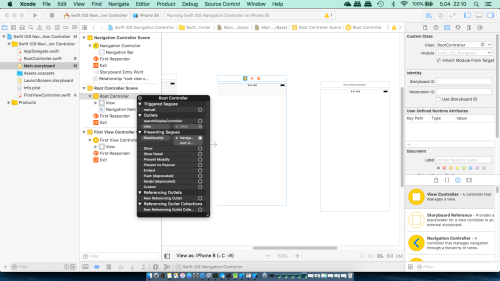
- Second: Single-click the yellow View Controller icon in the row of icons at the top of the Root Controller Scene (or in the Document Outline), press right mouse button and from popup menu drag from Triggered Segues | manual circle to the view controller we have just added
(
The same as above but in the Document Outline
)
and select Show from popup menu.
- First: Single-click the yellow View Controller icon in the row of icons at the top of the Root Controller Scene and drag to the view controller we have just added and select Manual Segue | Show from popup menu.
- Click on segue between Root Controller and First View Controler and bring up Attributes Inspector (we can use mouse or shortcut Alt+Command+4).
- In Storyboard Segue section as Identifier type
SegueFromRootToFirst
- Open
FirstViewController.swiftfile and add/modify
123456override func viewDidLoad() {super.viewDidLoad()// Do any additional setup after loading the view.self.navigationItem.title = "First View"} - Add a button to the Root Controller, set correct constraints and a title
Show details
- Press Show the Assistant editor button and Control-drag from the button to the Root Controller implementation and create
buttonPressShowDetailsaction
- Open
RootController.swiftfile and add/modify
123@IBAction func buttonPressShowDetails(_ sender: UIButton) {performSegue(withIdentifier: "SegueFromRootToFirst", sender: self)}
- Step 5: run the application
Now the application is ready to run.
- Step 6: passing data from root view to first view
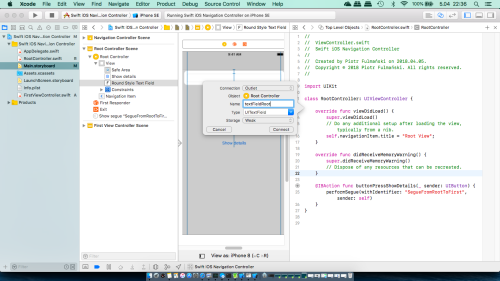
- Add a text field to the Root Controller and set correct constraints.
- Create an outlet for this text field named
textFieldRoot
- Add a property
stringDataFromRoottoFirstViewController.swift
12345678import UIKitclass FirstViewController: UIViewController {var stringDataFromRoot: String![...]} - Modify
viewDidLoadfromFirstViewController.swiftfile
1234567override func viewDidLoad() {super.viewDidLoad()// Do any additional setup after loading the view.self.navigationItem.title = "First View"print("Data from Root View: >\(self.stringDataFromRoot)<")} - Add to
RootController.swiftthe code
123456override func prepare(for segue: UIStoryboardSegue, sender: Any?) {if (segue.identifier == "SegueFromRootToFirst") {let firstVC = segue.destination as! FirstViewControllerfirstVC.stringDataFromRoot = textFieldRoot.text}}
- Step 7: run the application
Now the application is ready to run for the second time.
- Step 8: add programmatically a second view controller
- Create a new class named
TempViewControlleras we did it in step 4. - Add a button
Next levelto the FirstViewController. - Add an action
buttonPressNextLevelrelated to this button.
- Add View Controller to the storyboard.
- Single-click the yellow View Controller icon in the row of icons at the top of the View Controller Scene we have just added. Next press Alt+Command+3 to bring up the Identity Inspector. In the Custom Class section as Class select TempViewController.
- In storyboard, click on the Temp View Controller, click on the identity inspector and change the Storyboard ID to
IDTempViewController. Also click the check that says Use Storyboard ID.
- In
FirstViewController.madd/modify
12345@IBAction func buttonPressNextLevel(_ sender: UIButton) {let tempVC = storyboard?.instantiateViewController(withIdentifier: "IDTempViewController")tempVC?.title = "1"navigationController?.pushViewController(tempVC!, animated: true)}
- Create a new class named
- Step 9: run the application
Now the application is ready to run for the third time.
- Step 10: add programmatically an infinite numer of view controllers
- Add a button
Next levelto the TempViewController. - In
TempViewController.swiftadd an actionbuttonPressNextLevelrelated to this button. - In
TempViewController.swiftadd/modify
12345@IBAction func buttonPressNextLevel(_ sender: UIButton) {let tempVC = storyboard?.instantiateViewController(withIdentifier: "IDTempViewController")tempVC?.title = (title ?? "") + "1"navigationController?.pushViewController(tempVC!, animated: true)}
- Add a button
- Step 11: run the application
Now the application is ready to run for the fourth time.
UIViewController with UINavigationControllerWe now need to create the basic navigation structure for our application. At the core of this will be a
UINavigationController, which manages the stack of view controllers that a user can navigate between.


