Prepared and tested with Xcode 9.2 and Swift 4 (steps 1-9, 2018-03-03) and Xcode 10.2 (step 10 and step 11, 2019-04-08)
In this tutorial we cover the following topics
- General information
- Introduction
- Step 1: create a new project
- Step 2: add Table view and set connection
- Step 3: add a code
- Step 4: using table view cell styles
- Step 5: add an image
- Step 6: handling row selection
- Step 7: disable row selection
- Step 8: delete Table view row when swipe
- Step 9: making table cells reorderable
- Step 10: delete TableView row when swipe -- preferred way (since iOS 11)
- Step 11: select multiple rows
General information
Technically, a table view is the view object that displays a table’s data which is an instance of the class
UITableView. Each visible row in a table is implemented by an instance of the UITableViewCell class. Table views are not responsible for storing table’s data. They store only enough data to draw the rows that are currently visible. Table views get their configuration data from an object that conforms to the UITableViewDelegate protocol and their row data from an object that conforms to the UITableViewDataSource protocol.
We can also put more data, than standatd title and details one-line strings, in a cell if we need to by adding subviews to UITableViewCell. We do this using either by adding subviews programmatically when creating the cell or by loading them from a storyboard or nib file.
Table views come in two basic styles
- Grouped A grouped table view contains one or more sections of rows. Within each section, all rows sit tightly together in a nice little group; but between sections, there are clearly visible gaps.
- Plain This is the default style. In this style, the sections are slightly closer together, and each section’s header can optionally be styled in a custom manner. When an index is used, this style is also referred to as indexed.
Introduction
- Step 1: create a new project
Create a new project- Select File | New | Project...
- Select Single View Application on the template selection sheet.
- As the product name enter
Swift iOS Table View Basic - Set the Language to Swift. Because we will not use tests in this tutorial, you can leave both test check boxes unchecked as well as make sure the check box labeled Use Core Data is also unchecked.
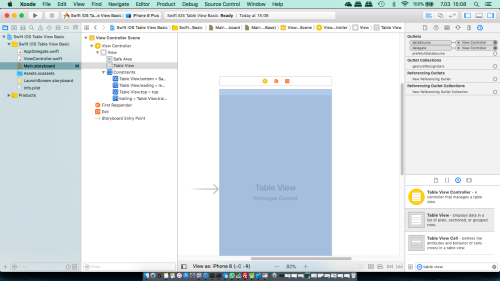
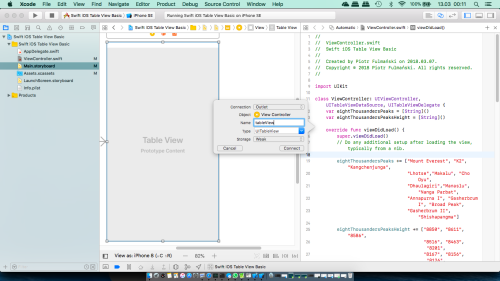
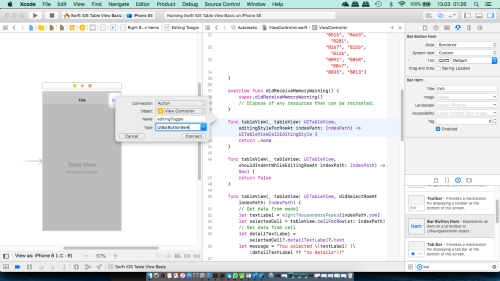
- Step 2: add Table view and set connections
- Select
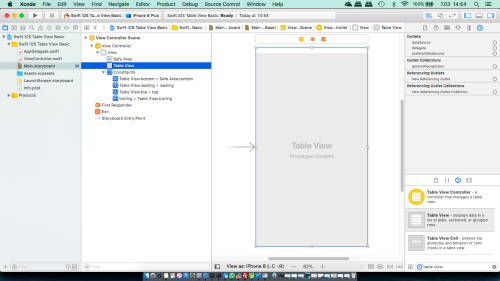
Main.storyboardto edit the storyboard. - Find in the object library a Table View and drag it over to the View window.
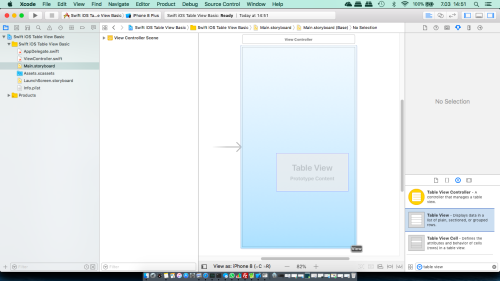
- Add all necessary constraints to make sure that the table view is positioned and sized correctly.

- Select the table view in the Document Inspector and bring up the Connections Inspector (use shortcut: Alt + Command + 6)
- Drag from the circle next to dataSource and delegate in Outlets section to the View Controller icon in the Document Outline
or above the view controller in the storyboard editor.
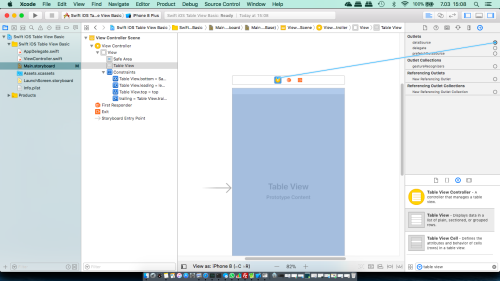
This makes our controller class both the data source and delegate for this table.
- Select
- Step 3: add a code
- Single-click
ViewController.swiftand add the following code
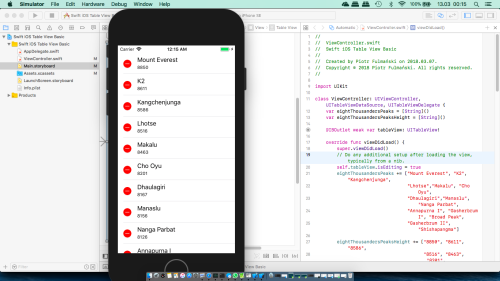
123456789101112131415161718192021222324252627282930313233343536373839404142434445464748//// ViewController.swift// Swift iOS Table View Basic//// Created by Piotr Fulmański on 2018.03.07.// Copyright © 2018 Piotr Fulmański. All rights reserved.//import UIKitclass ViewController: UIViewController, UITableViewDataSource, UITableViewDelegate {var eightThousandersPeaks = [String]()override func viewDidLoad() {super.viewDidLoad()// Do any additional setup after loading the view, typically from a nib.eightThousandersPeaks += ["Mount Everest", "K2", "Kangchenjunga","Lhotse","Makalu", "Cho Oyu","Dhaulagiri","Manaslu", "Nanga Parbat","Annapurna I", "Gasherbrum I", "Broad Peak","Gasherbrum II", "Shishapangma"]}override func didReceiveMemoryWarning() {super.didReceiveMemoryWarning()// Dispose of any resources that can be recreated.}func tableView(_ tableView: UITableView, numberOfRowsInSection section: Int) -> Int {return eightThousandersPeaks.count;}func tableView(_ tableView: UITableView, cellForRowAt indexPath: IndexPath) -> UITableViewCell {// Trick to get static variable in Swiftstruct staticVariable { static var tableIdentifier = "TableIdentifier" }var cell:UITableViewCell? = tableView.dequeueReusableCell(withIdentifier: staticVariable.tableIdentifier)if cell == nil {cell = UITableViewCell(style: .default, reuseIdentifier: staticVariable.tableIdentifier)}cell?.textLabel?.text = eightThousandersPeaks[indexPath.row]return cell!}}

- Single-click
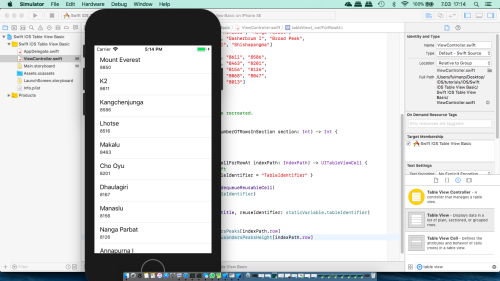
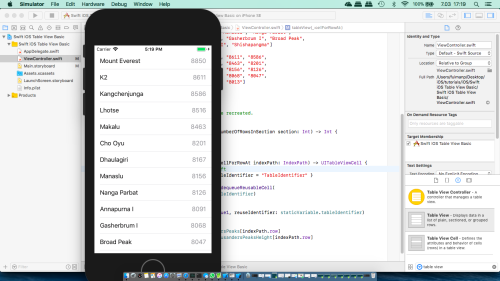
- Step 4: using table view cell styles
Except the defaultUITableViewCellStyleDefaulttheUITableViewCellclass includes several other predefined cell styles that let us easily add a bit more variety to our table views. These cell styles use three different cell elements- Text label This is the cell’s main text. In the case of the default style
UITableViewCellStyleDefaultthe text label is the only text shown in the cell. - Detail text label This is the cell’s secondary text, usually used as an explanatory note or label.
- Image If an image is part of the specified style, the image is displayed to the left of the cell’s text.
Let's see all of them
- Single-click
ViewController.swiftand to enable detail text label add/modify the following code
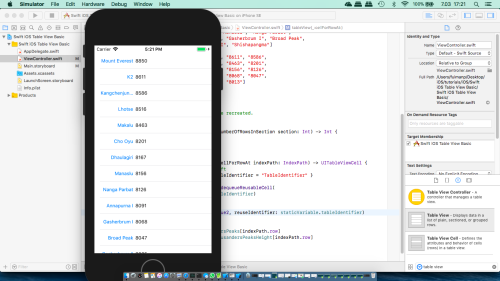
1234567891011121314151617181920212223242526272829303132333435363738394041424344454647484950515253545556//// ViewController.swift// Swift iOS Table View Basic//// Created by Piotr Fulmański on 2018.03.07.// Copyright © 2018 Piotr Fulmański. All rights reserved.//import UIKitclass ViewController: UIViewController, UITableViewDataSource, UITableViewDelegate {var eightThousandersPeaks = [String]()var eightThousandersPeaksHeight = [String]()override func viewDidLoad() {super.viewDidLoad()// Do any additional setup after loading the view, typically from a nib.eightThousandersPeaks += ["Mount Everest", "K2", "Kangchenjunga","Lhotse","Makalu", "Cho Oyu","Dhaulagiri","Manaslu", "Nanga Parbat","Annapurna I", "Gasherbrum I", "Broad Peak","Gasherbrum II", "Shishapangma"]eightThousandersPeaksHeight += ["8850", "8611", "8586","8516", "8463", "8201","8167", "8156", "8126","8091", "8068", "8047","8035", "8013"]}override func didReceiveMemoryWarning() {super.didReceiveMemoryWarning()// Dispose of any resources that can be recreated.}func tableView(_ tableView: UITableView, numberOfRowsInSection section: Int) -> Int {return eightThousandersPeaks.count;}func tableView(_ tableView: UITableView, cellForRowAt indexPath: IndexPath) -> UITableViewCell {// Trick to get static variable in Swiftstruct staticVariable { static var tableIdentifier = "TableIdentifier" }var cell:UITableViewCell? = tableView.dequeueReusableCell(withIdentifier: staticVariable.tableIdentifier)if cell == nil {cell = UITableViewCell(style: .subtitle, reuseIdentifier: staticVariable.tableIdentifier)}cell?.textLabel?.text = eightThousandersPeaks[indexPath.row]cell?.detailTextLabel?.text = eightThousandersPeaksHeight[indexPath.row]return cell!}}
- Let's change table view cell styles again. Single-click
ViewController.swiftand to enable detail text label add/modify the following code
12345...if cell == nil {cell = UITableViewCell(style: .value1, reuseIdentifier: staticVariable.tableIdentifier)}....
- Let's change table view cell styles again. Single-click
ViewController.swiftand to enable detail text label add/modify the following code
12345...if cell == nil {cell = UITableViewCell(style: .value2, reuseIdentifier: staticVariable.tableIdentifier)}....
- Text label This is the cell’s main text. In the case of the default style
- Step 5: add an image
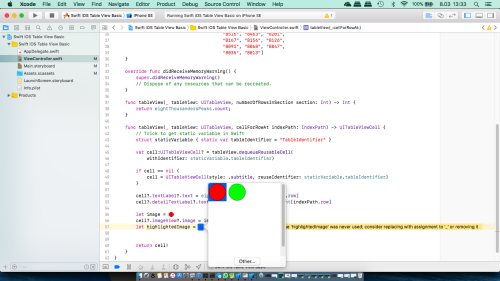
For all style exceptUITableViewCellStyleValue2we can add an icon.- Prepare two images: one for selected row and second for not selected. In my case I have two dots (red and green) 24 pixels height and 24 pixels width. Both should be prepared in 3 sizes to be compatible with retina displays
- Click Assets.xcassets in the project navigator to bring up the Asset Catalog for the project and drag and drop images (every image in three different scales)


- Single-click
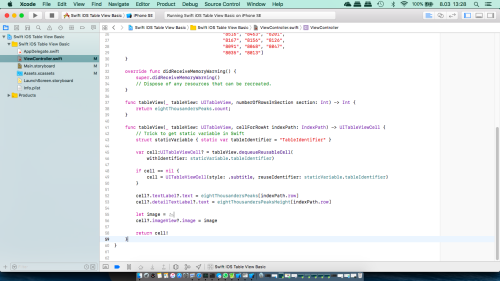
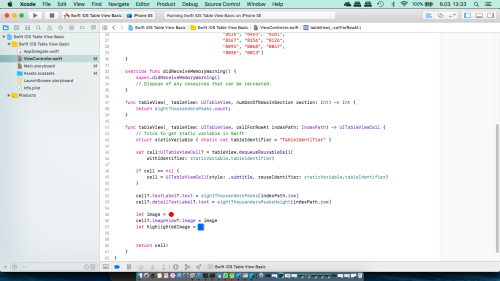
ViewController.swiftand add/modify the following code
123456789101112131415161718class ViewController: UIViewController, UITableViewDataSource, UITableViewDelegate {...func tableView(_ tableView: UITableView, cellForRowAt indexPath: IndexPath) -> UITableViewCell {...cell?.detailTextLabel?.text = eightThousandersPeaksHeight[indexPath.row]let image = UIImage(named: "dot_green")cell?.imageView?.image = imagelet highlightedImage = UIImage(named: "dot_red")cell?.imageView?.highlightedImage = highlightedImagereturn cell!}}


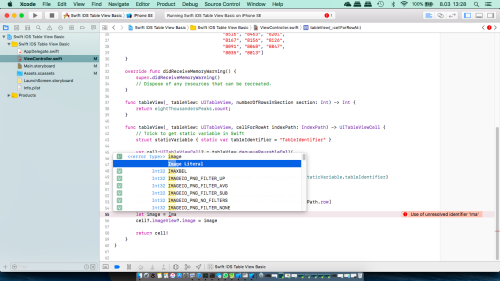
Swift 3 introduces Image Literals (Be Literal!)


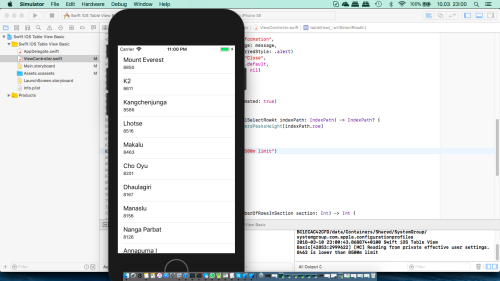
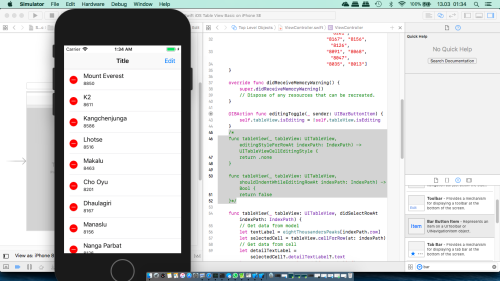
- Step 6: handling row selection
Now we are going to implement the delegate method that is called after a row has been selected. - Single-click
ViewController.swiftand add/modify the following code
1234567891011121314151617181920func tableView(_ tableView: UITableView, didSelectRowAt indexPath: IndexPath) {// Get data from modellet textLabel = eightThousandersPeaks[indexPath.row]let selectedCell = tableView.cellForRow(at: indexPath)// Get data from celllet detailTextLabel = selectedCell?.detailTextLabel?.textlet message = "You selected \(textLabel) (\(detailTextLabel ?? "no details"))"let alert = UIAlertController(title: "Information",message: message,preferredStyle: .alert)let cancelAction = UIAlertAction(title: "Close",style: .default,handler: nil)alert.addAction(cancelAction)self.present(alert, animated: true)tableView.deselectRow(at: indexPath, animated: true)}

More abut alerts can be found at How To: Displaying Alerts With UIAlertController In Swift
- Step 7: disable row selection
The second table’s delegate method that allow us to handle row selection istableView(_:willSelectRowAt:)which is called before the row is selected. It can be used to prevent the row from being selected or even to change which row gets selected. - Single-click
ViewController.swiftand add/modify the following code
1234567891011121314func tableView(_ tableView: UITableView, willSelectRowAt indexPath: IndexPath) -> IndexPath? {let detailTextLabel = self.eightThousandersPeaksHeight[indexPath.row]if let height = Int(detailTextLabel) {if (height < 8500) {print("\(height) is lower than 8500m limit")return nil;} else {return indexPath;}} else {return nil}}

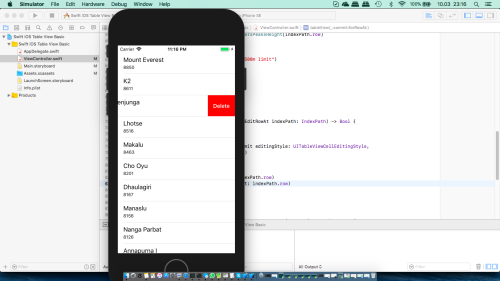
- Step 8: delete TableView row when swipe
Note: This is very basic method available from iOS 2.0 (How to swipe to delete UITableViewCells). Another (and preferred) method to complete this task is described in step 10.- Single-click
ViewController.swiftand add/modify the following code
1234567891011121314func tableView(_ tableView: UITableView, canEditRowAt indexPath: IndexPath) -> Bool {return true}func tableView(_ tableView: UITableView, commit editingStyle: UITableViewCellEditingStyle,forRowAt indexPath: IndexPath){if editingStyle == .delete{eightThousandersPeaks.remove(at: indexPath.row)eightThousandersPeaksHeight.remove(at: indexPath.row)tableView.reloadData()}}
- Single-click
- Step 9: making table cells reorderable
- To enable editing mode for a table view, create an outlet: hold down the Control key and drag the mouse from the Table View to the ViewController.swift class code

This should add the following code
12345678910class ViewController: UIViewController, UITableViewDataSource, UITableViewDelegate {...@IBOutlet weak var tableView: UITableView!override func viewDidLoad() {...}...} - Having an outlet add/modify the following code
1234567override func viewDidLoad() {super.viewDidLoad()// Do any additional setup after loading the view, typically from a nib.self.tableView.isEditing = trueeightThousandersPeaks += ......}
Enabling the edit mode causes delete buttons to be visible for all cells:
To hide delete buttons add/modify the following code
1234567func tableView(_ tableView: UITableView, editingStyleForRowAt indexPath: IndexPath) -> UITableViewCellEditingStyle {return .none}func tableView(_ tableView: UITableView, shouldIndentWhileEditingRowAt indexPath: IndexPath) -> Bool {return false} - To enable/disable the edit mode from the Object Library drag Navigation Bar component, place it on top of existing table view and add all necessary constraints

Add a Bar Button Item to the right of the Navigation Bar
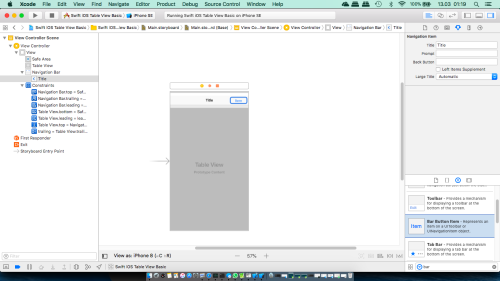
Select the Bar button item and in the Attributes inspector in the Title field change it to Edit
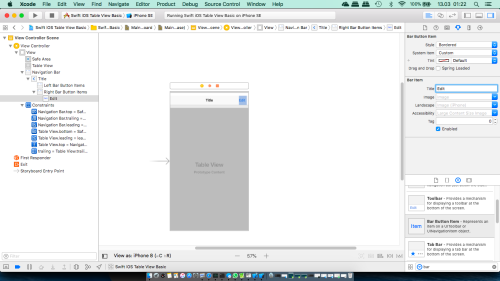
Open The Assistant Editor and make sure theViewController.swiftfile is visible. Control and drag from the Bar Button Item to theViewController.swiftclass and create theeditingToggleaction
Add/modify the following code123@IBAction func editingToggle(_ sender: UIBarButtonItem) {self.tableView.isEditing = !self.tableView.isEditing}comment
12345678/*func tableView(_ tableView: UITableView, editingStyleForRowAt indexPath: IndexPath) -> UITableViewCellEditingStyle {return .none}func tableView(_ tableView: UITableView, shouldIndentWhileEditingRowAt indexPath: IndexPath) -> Bool {return false}*/change
viewDidLoad()method from12345override func viewDidLoad() {...self.tableView.isEditing = true...}to
12345override func viewDidLoad() {...self.tableView.isEditing = false...}and make a test: every time we press Edit button, we enable/disable the table view edit mode

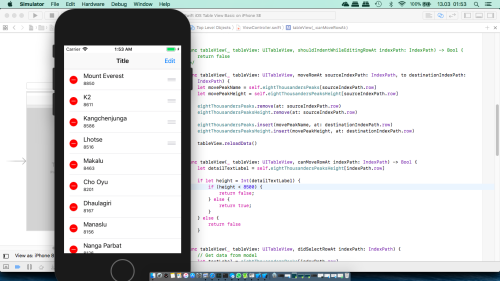
- Enable the reorder control to move cells and implement the code so that the elements in the underlying data arrays are updated
123456789101112func tableView(_ tableView: UITableView, moveRowAt sourceIndexPath: IndexPath, to destinationIndexPath: IndexPath) {let movePeakName = self.eightThousandersPeaks[sourceIndexPath.row]let movePeakHeight = self.eightThousandersPeaksHeight[sourceIndexPath.row]eightThousandersPeaks.remove(at: sourceIndexPath.row)eightThousandersPeaksHeight.remove(at: sourceIndexPath.row)eightThousandersPeaks.insert(movePeakName, at: destinationIndexPath.row)eightThousandersPeaksHeight.insert(movePeakHeight, at: destinationIndexPath.row)tableView.reloadData()}


- Optionally we can add/modify the following code to enable the reorder control only for some rows:
12345678910111213func tableView(_ tableView: UITableView, canMoveRowAt indexPath: IndexPath) -> Bool {let detailTextLabel = self.eightThousandersPeaksHeight[indexPath.row]if let height = Int(detailTextLabel) {if (height < 8500) {return false;} else {return true;}} else {return false}}
- To enable editing mode for a table view, create an outlet: hold down the Control key and drag the mouse from the Table View to the ViewController.swift class code
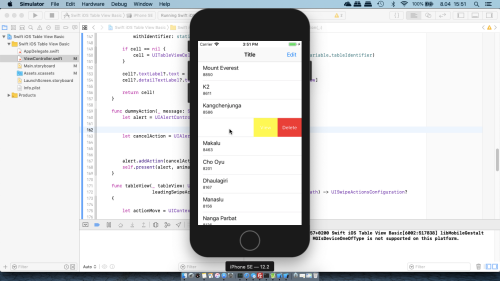
- Step 10: delete TableView row when swipe -- preferred way (since iOS 11)
Here is an another (and preferred) method to delete on swipe: the swipe actions. Swipe actions replace the older edit actions (yet another method than described in step 8) and are the preferred way starting with iOS 11. The edit action API is not deprecated in iOS 11 but it may be in a future release.- Make a following comment
123456789101112/*func tableView(_ tableView: UITableView, commit editingStyle: UITableViewCellEditingStyle,forRowAt indexPath: IndexPath){if editingStyle == .delete{eightThousandersPeaks.remove(at: indexPath.row)eightThousandersPeaksHeight.remove(at: indexPath.row)tableView.reloadData()}}*/
Now we shouldn't be able to delete by swipe. - Add the following code
1234567891011121314151617181920212223242526272829303132333435363738394041424344454647484950515253545556575859func dummyAction(_ message: String) {let alert = UIAlertController(title: "Information",message: message,preferredStyle: .alert)let cancelAction = UIAlertAction(title: "Close",style: .default,handler: nil)alert.addAction(cancelAction)self.present(alert, animated: true)}func tableView(_ tableView: UITableView,leadingSwipeActionsConfigurationForRowAt indexPath: IndexPath) -> UISwipeActionsConfiguration?{let actionMove = UIContextualAction(style: .normal,title: "Move",handler: { (action:UIContextualAction, view:UIView, completionHandler:(Bool) -> Void) inself.dummyAction("Move action")})actionMove.backgroundColor = .bluelet actionEdit = UIContextualAction(style: .normal,title: "Edit",handler: { (action:UIContextualAction, view:UIView, completionHandler:(Bool) -> Void) inself.dummyAction("Edit action")})actionEdit.backgroundColor = .greenlet configuration = UISwipeActionsConfiguration(actions: [actionMove, actionEdit])return configuration}func tableView(_ tableView: UITableView,trailingSwipeActionsConfigurationForRowAt indexPath: IndexPath) -> UISwipeActionsConfiguration?{let actionDelete = UIContextualAction(style: .normal,title: "Delete",handler: { (action:UIContextualAction, view:UIView, completionHandler:(Bool) -> Void) inself.dummyAction("Delete action")})actionDelete.backgroundColor = .redlet actionView = UIContextualAction(style: .normal,title: "View",handler: { (action:UIContextualAction, view:UIView, completionHandler:(Bool) -> Void) inself.dummyAction("View action")})actionView.backgroundColor = .yellowlet configuration = UISwipeActionsConfiguration(actions: [actionDelete, actionView])configuration.performsFirstActionWithFullSwipe = falsereturn configuration}


- Please note that active option
configuration.performsFirstActionWithFullSwipe = false
123456789func tableView(_ tableView: UITableView,trailingSwipeActionsConfigurationForRowAt indexPath: IndexPath) -> UISwipeActionsConfiguration?{...let configuration = UISwipeActionsConfiguration(actions: [actionDelete, actionView])configuration.performsFirstActionWithFullSwipe = falsereturn configuration}
stops performing the first action in response to full swipe across the whole row.
- Make a following comment
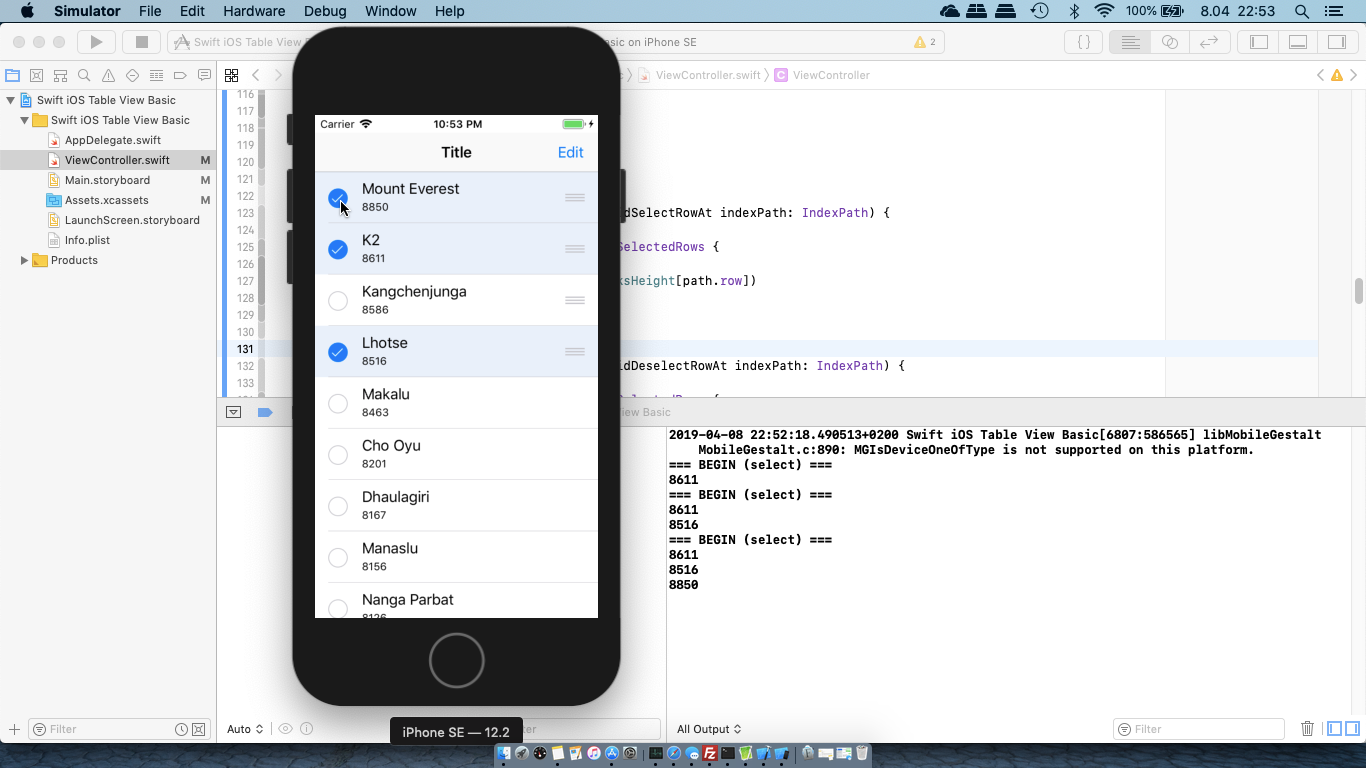
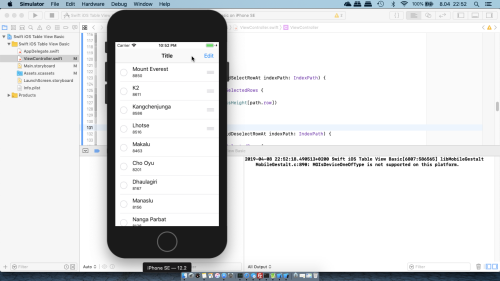
- Step 11: select multiple rows
- Add a following code in
ViewController.swift
123456override func viewDidLoad() {...self.tableView.isEditing = falseself.tableView.allowsMultipleSelectionDuringEditing = true...} - Next comment
tableView:didSelectRowAtmethod
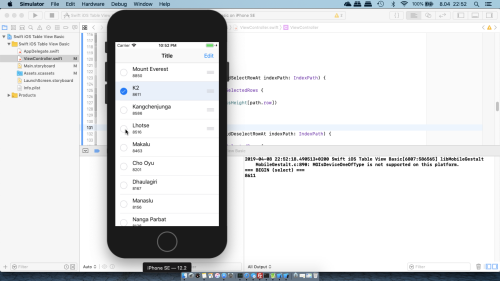
12345/*func tableView(_ tableView: UITableView, didSelectRowAt indexPath: IndexPath) {...}*/ - Add the following code
1234567891011121314151617func tableView(_ tableView: UITableView, didSelectRowAt indexPath: IndexPath) {print("=== BEGIN (select) ===")if let paths = tableView.indexPathsForSelectedRows {for path in paths {print(self.eightThousandersPeaksHeight[path.row])}}}func tableView(_ tableView: UITableView, didDeselectRowAt indexPath: IndexPath) {print("=== BEGIN (deselect) ===")if let paths = tableView.indexPathsForSelectedRows {for path in paths {print(self.eightThousandersPeaksHeight[path.row])}}}
Now we should be able to select multiple list items


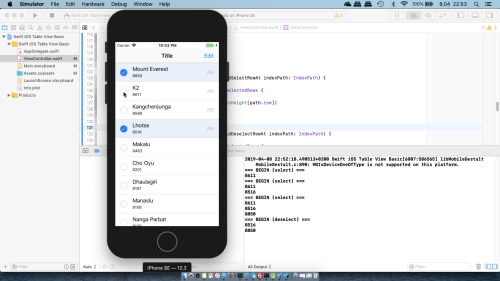
123456789101112=== BEGIN (select) ===8611=== BEGIN (select) ===86118516=== BEGIN (select) ===861185168850=== BEGIN (deselect) ===85168850
- Add a following code in