
- Prerequisites
- Download, Configure, and Start HBase in Standalone Mode
- Working with HBase via command line
- Working with HBase from Python via HappyBase
As you may know, there are three options to install HBase (see Quick Start - Standalone HBase:
- A standalone instance which has all HBase daemons - the Master, RegionServers, and ZooKeeper - running in a single JVM and persisting to the local filesystem. It is the most simple and basic deploy profile.
A sometimes useful variation on standalone hbase has all daemons running inside the one JVM but rather than persist to the local filesystem, instead they persist to an HDFS instance. (see: 5.1.1. Standalone HBase over HDFS
- pseudo-distributed which is distributed but all daemons run on a single node. Pseudo-distributed mode can run against the local filesystem or it can run against an instance of the Hadoop Distributed File System (HDFS).
- fully-distributed where the daemons are spread across all nodes in the cluster. Fully-distributed mode can ONLY run on HDFS
Whatever your mode, you will need to configure HBase by editing files in the HBase conf directory. At a minimum, you must edit conf/hbase-env.sh to tell HBase which java to use. In this file you set HBase environment variables such as the heapsize and other options for the JVM, the preferred location for log files, etc. Set JAVA_HOME to point at the root of your java install.
- Step 1 - download
Choose a download site from this list of Apache Download Mirrors. Click on the suggested top link. This will take you to a mirror of HBase Releases. Click on the folder named stable and then download the binary file that ends in.tar.gzto your local filesystem. Do not download the file ending insrc.tar.gzfor now.Download HBase from HBase download page (in my case I downloaded HBase 2.5 which is quite fresh as of time I'm writing this; version 3.0 is available but not stable):
1hbase-2.5.0-bin.tar.gz 2022-08-23 19:25 300Mas well as file(s) to check correctnes of the binary file:
1hbase-2.5.0-bin.tar.gz.sha512 2022-08-23 19:25 216and saved them in (of course you can select different location):
1/home/nosql/Pulpit/nosql2_install/hbase1234567nosql@nosql:~$ pwd/home/nosqlnosql@nosql:~$ cd Pulpit/nosql2_install/hbase/nosql@nosql:~/Pulpit/nosql2_install/hbase$ ls -lrazem 306948-rw-r--r-- 1 nosql hadoopuser 314303339 paź 9 14:36 hbase-2.5.0-bin.tar.gz-rw-r--r-- 1 nosql hadoopuser 216 paź 9 14:42 hbase-2.5.0-bin.tar.gz.sha512 - Step 2 - verrify downloaded file integrity.
123456nosql@nosql:~/Pulpit/nosql2_install/hbase$ sha512sum hbase-2.5.0-bin.tar.gz1e0ebf9a457a8ed59a0e1ea06eaa6019f63575c317588175f18ee2506cf0e527516952cb026db84d4af890be35f74c29f8e87c41e0dcf99393c09bd48668e16f hbase-2.5.0-bin.tar.gznosql@nosql:~/Pulpit/nosql2_install/hbase$ cat hbase-2.5.0-bin.tar.gz.sha512hbase-2.5.0-bin.tar.gz: 1E0EBF9A 457A8ED5 9A0E1EA0 6EAA6019 F63575C3 17588175F18EE250 6CF0E527 516952CB 026DB84D 4AF890BE 35F74C29F8E87C41 E0DCF993 93C09BD4 8668E16F
- Step 3 - unpack downloaded file.
1234567nosql@nosql:~/Pulpit/nosql2_install/hbase$ tar xzvf hbase-2.5.0-bin.tar.gz[...]nosql@nosql:~/Pulpit/nosql2_install/hbase$ ls -lrazem 306952drwxr-xr-x 7 nosql hadoopuser 4096 paź 9 14:49 hbase-2.5.0-rw-r--r-- 1 nosql hadoopuser 314303339 paź 9 14:36 hbase-2.5.0-bin.tar.gz-rw-r--r-- 1 nosql hadoopuser 216 paź 9 14:42 hbase-2.5.0-bin.tar.gz.sha512
- Step 4 - move uncompressed files (hbase-2.5.0 directory) to new, working directory.
123456789101112nosql@nosql:~/Pulpit/nosql2_install/hbase$ mv hbase-2.5.0 ~/Pulpit/nosql2/nosql@nosql:~/Pulpit/nosql2_install/hbase$ ls -lrazem 306948-rw-r--r-- 1 nosql hadoopuser 314303339 paź 9 14:36 hbase-2.5.0-bin.tar.gz-rw-r--r-- 1 nosql hadoopuser 216 paź 9 14:42 hbase-2.5.0-bin.tar.gz.sha512nosql@nosql:~/Pulpit/nosql2_install/hbase$ ls -l ~/Pulpit/nosql2razem 20drwxr-xr-x 10 nosql hadoopuser 4096 lip 21 2021 apache-tinkerpop-gremlin-console-3.5.1drwxrwxr-x 2 nosql hadoopuser 4096 lis 26 2021 hadoop_hdfsdrwxr-xr-x 7 nosql hadoopuser 4096 paź 9 14:49 hbase-2.5.0drwxr-xr-x 6 nosql hadoopuser 4096 gru 9 2021 javadrwxr-xr-x 2 nosql hadoopuser 4096 sty 6 2022 pig
Above you can see other components which are present in my system but not required for this tutori
- Step 5 - remove compressed file.
12345678nosql@nosql:~/Pulpit/nosql2_install$ ls -lrazem 8drwxr-xr-x 2 nosql hadoopuser 4096 paź 9 14:52 hbasedrwxr-xr-x 2 nosql hadoopuser 4096 sty 6 2022 pignosql@nosql:~/Pulpit/nosql2_install$ rm -r hbase/nosql@nosql:~/Pulpit/nosql2_install$ ls -lrazem 4drwxr-xr-x 2 nosql hadoopuser 4096 sty 6 2022 pig
- Step 6 - check if the
JAVA_HOMEenvironment variable is set.12nosql@nosql:~/Pulpit/nosql2_install/hbase$ echo $JAVA_HOME/usr/lib/jvm/java-11-openjdk-amd64If not, you can do this manually:
1export JAVA_HOME=/usr/lib/jvm/java-11-openjdk-amd64or edit
conf/hbase-env.shand uncomment the line starting with#export JAVA_HOME=or add it, and then set it to your Java installation path.You can set it also in your environment config file (for example
~/.bashrc) by adding to it the following line1export JAVA_HOME=/usr/lib/jvm/java-11-openjdk-amd64 - Step 7 - configure
Because HBase depends on Hadoop, it bundles Hadoop jars under its lib directory. The bundled jars are ONLY for use in stand-alone mode. In distributed mode, it is critical that the version of Hadoop that is out on your cluster match what is under HBase. Replace the hadoop jars found in the HBase lib directory with the equivalent hadoop jars from the version you are running on your cluster to avoid version mismatch issues. Make sure you replace the jars under HBase across your whole cluster. ([see also])
If you are going to start HBase in stand-alone mode, be sure that no other Hadoop component is running and no Hadoop environment is set. If you forget about this, you will get some strange messages like:12345678[...]2022-09-23 13:04:04,510 INFO [master/localhost:16000:becomeActiveMaster] regionserver.ChunkCreator: Allocating index MemStoreChunkPool with chunk size 204.80 KB, max count 194, initial count 02022-09-23 13:04:04,602 ERROR [master/localhost:16000:becomeActiveMaster] master.HMaster: Failed to become active masterjava.net.ConnectException: Call From nosql/127.0.0.1 to localhost:9000 failed on connection exception: java.net.ConnectException: Połączenie odrzucone; For more details see: http://wiki.apache.org/hadoop/ConnectionRefusedat sun.reflect.NativeConstructorAccessorImpl.newInstance0(Native Method)at sun.reflect.NativeConstructorAccessorImpl.newInstance(NativeConstructorAccessorImpl.java:62)at sun.reflect.DelegatingConstructorAccessorImpl.newInstance(DelegatingConstructorAccessorImpl.java:45)[...]This is why in my file I have to comment the following lines:
1234567891011121314151617#export HADOOP_HOME=/usr/local/hadoop#export HADOOP_INSTALL=$HADOOP_HOME#export HADOOP_MAPRED_HOME=$HADOOP_HOME#export HADOOP_COMMON_HOME=$HADOOP_HOME#export HADOOP_HDFS_HOME=$HADOOP_HOME#export YARN_HOME=$HADOOP_HOME#export HADOOP_COMMON_LIB_NATIVE_DIR=$HADOOP_HOME/lib/native#export PATH=$PATH:$HADOOP_HOME/sbin:$HADOOP_HOME/bin#export HADOOP_OPTS="-Djava.library.path=$HADOOP_HOME/lib/native"#Sqoop#export SQOOP_HOME=/usr/lib/sqoop#export PATH=$PATH:$SQOOP_HOME/bin#Pig#export PIG_HOME=/usr/lib/pig#export PATH=$PATH:$PIG_HOME/binTo make this, you can use any editor you like:
12nosql@nosql:~/Pulpit/nosql2_install/hbase$ cd ~nosql@nosql:~$ nano ~/.bashrcIn this case you should logout and again login to "clear" all environment variables which may be set. The following command:
1nosql@nosql:~$ source ~/.bashrcwill not do this. After source
$HADOOP_HOMEis still defined:12nosql@nosql:~$ echo $HADOOP_HOME/usr/local/hadoopAfter re-login:
1nosql@nosql:~$ echo $HADOOP_HOME - Step 8 - start HBase
Usestart-hbase.sh,hbase shell,stop-hbase.shto start, interact with and stop HBase:12345nosql@nosql:~$ /home/nosql/Pulpit/nosql2/hbase-2.5.0/bin/start-hbase.shrunning master, logging to /home/nosql/Pulpit/nosql2/hbase-2.5.0/bin/../logs/hbase-nosql-master-nosql.outnosql@nosql:~$ jps6586 Jps6429 HMasterThe
bin/start-hbase.shscript is provided as a convenient way to start HBase. Issue the command, and if all goes well, a message is logged to standard output showing that HBase started successfully. You can use the jps command to verify that you have one running process called HMaster. In standalone mode HBase runs all daemons within this single JVM, i.e. the HMaster, a single HRegionServer, and the ZooKeeper daemon. Go tohttp://localhost:16010to view the HBase Web UI: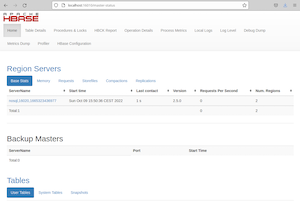
- Step 9 - start HBase shell to allow interaction
123456789101112131415161718nosql@nosql:~$ /home/nosql/Pulpit/nosql2/hbase-2.5.0/bin/hbase shellWARNING: An illegal reflective access operation has occurredWARNING: Illegal reflective access by org.apache.hadoop.security.authentication.util.KerberosUtil (file:/home/nosql/Pulpit/nosql2/hbase-2.5.0/lib/hadoop-auth-2.10.2.jar) to method sun.security.krb5.Config.getInstance()WARNING: Please consider reporting this to the maintainers of org.apache.hadoop.security.authentication.util.KerberosUtilWARNING: Use --illegal-access=warn to enable warnings of further illegal reflective access operationsWARNING: All illegal access operations will be denied in a future releaseHBase ShellUse "help" to get list of supported commands.Use "exit" to quit this interactive shell.For Reference, please visit: http://hbase.apache.org/2.0/book.html#shellVersion 2.5.0, r2ecd8bd6d615ca49bfb329b3c0c126c80846d4ab, Tue Aug 23 15:58:57 UTC 2022Took 0.0014 secondshbase:001:0> listTABLE0 row(s)Took 0.6876 seconds=> []hbase:002:0> quit
- Step 10 - stop HBase
12nosql@nosql:~$ /home/nosql/Pulpit/nosql2/hbase-2.5.0/bin/stop-hbase.shstopping hbase.................

You may find useful the following documents:
Start HBase:
|
1 2 |
nosql@nosql:~$ Pulpit/nosql2/hbase-2.5.0/bin/start-hbase.sh running master, logging to /home/nosql/Pulpit/nosql2/hbase-2.5.0/bin/../logs/hbase-nosql-master-nosql.out |
Start HBase Shell:
|
1 2 3 4 5 6 7 8 9 10 11 12 |
nosql@nosql:~$ Pulpit/nosql2/hbase-2.5.0/bin/hbase shell WARNING: An illegal reflective access operation has occurred WARNING: Illegal reflective access by org.apache.hadoop.security.authentication.util.KerberosUtil (file:/home/nosql/Pulpit/nosql2/hbase-2.5.0/lib/hadoop-auth-2.10.2.jar) to method sun.security.krb5.Config.getInstance() WARNING: Please consider reporting this to the maintainers of org.apache.hadoop.security.authentication.util.KerberosUtil WARNING: Use --illegal-access=warn to enable warnings of further illegal reflective access operations WARNING: All illegal access operations will be denied in a future release HBase Shell Use "help" to get list of supported commands. Use "exit" to quit this interactive shell. For Reference, please visit: http://hbase.apache.org/2.0/book.html#shell Version 2.5.0, r2ecd8bd6d615ca49bfb329b3c0c126c80846d4ab, Tue Aug 23 15:58:57 UTC 2022 Took 0.0037 seconds |
Check existing tables:
|
1 2 3 4 5 |
hbase:001:0> list TABLE 0 row(s) Took 0.7390 seconds => [] |
If you want, you may create a namespace for your table(s):
|
1 2 |
hbase:004:0> create_namespace 'test' Took 0.1879 seconds |
Create a table table1 in namespace test:
|
1 2 3 4 |
hbase:005:0> create 'test:table1', 'f1' Created table test:table1 Took 0.6869 seconds => Hbase::Table - test:table1 |
Verify if table exists:
|
1 2 3 4 5 6 |
hbase:006:0> list TABLE test:table1 1 row(s) Took 0.0144 seconds => ["test:table1"] |
Add some data to your table. Pay attention to order of keys:
|
1 2 3 4 5 6 |
hbase:007:0> put 'test:table1', 'key010', 'f1:column_a', 'my_value_001' Took 0.2910 seconds hbase:008:0> put 'test:table1', 'key005', 'f1:column_a', 'my_value_002' Took 0.0086 seconds hbase:009:0> put 'test:table1', 'key002', 'f1:column_b', 'my_value_003' Took 0.0094 seconds |
Count the number of items (records) in table:
|
1 2 3 4 |
hbase:013:0> count 'test:table1' 3 row(s) Took 0.0731 seconds => 3 |
Scan table to get all elements:
|
1 2 3 4 5 6 7 8 9 10 |
hbase:011:0> scan 'test:table1' ROW COLUMN+CELL key002 column=f1:column_b, timestamp=2022-12-03T21:24:14.747, val ue=my_value_003 key005 column=f1:column_a, timestamp=2022-12-03T21:24:02.723, val ue=my_value_002 key010 column=f1:column_a, timestamp=2022-12-03T21:23:47.004, val ue=my_value_001 3 row(s) Took 0.0721 seconds |
Scan range of table providing STARTROW and/or STOPROW. Note that the startrow is inclusive while the stoprow is exclusive.
|
1 2 3 4 5 6 7 8 |
hbase:019:0> scan 'test:table1', {STARTROW => "key005"} ROW COLUMN+CELL key005 column=f1:column_a, timestamp=2022-12-03T21:24:02.723, value=my_value_0 02 key010 column=f1:column_a, timestamp=2022-12-03T21:23:47.004, value=my_value_0 01 2 row(s) Took 0.0241 seconds |
Scan only selected columns limiting to a given number of elements:
|
1 2 3 4 5 6 |
hbase:002:0> scan 'test:table1', {COLUMNS => ['f1:column_a'], LIMIT => 1} ROW COLUMN+CELL key005 column=f1:column_a, timestamp=2022-12-03T21:24:02.723, value=my_value_0 02 1 row(s) Took 0.0504 seconds |
Scan table providing prefix for row key:
|
1 2 3 4 5 6 7 8 |
hbase:003:0> scan 'test:table1', {ROWPREFIXFILTER => 'key00'} ROW COLUMN+CELL key002 column=f1:column_b, timestamp=2022-12-03T21:24:14.747, value=my_value_0 03 key005 column=f1:column_a, timestamp=2022-12-03T21:24:02.723, value=my_value_0 02 2 row(s) Took 0.0215 seconds |
You can also redirect result of scan to a file with the following command (execute this command not from HBase shell but from terminal):
|
1 2 3 4 5 6 7 |
nosql@nosql:~/Pulpit/nosql2/hbase-2.5.0/bin$ echo "scan 'test:table1'" | ./hbase shell > ~/res.txt WARNING: An illegal reflective access operation has occurred WARNING: Illegal reflective access by org.apache.hadoop.security.authentication.util.KerberosUtil (file:/home/nosql/Pulpit/nosql2/hbase-2.5.0/lib/hadoop-auth-2.10.2.jar) to method sun.security.krb5.Config.getInstance() WARNING: Please consider reporting this to the maintainers of org.apache.hadoop.security.authentication.util.KerberosUtil WARNING: Use --illegal-access=warn to enable warnings of further illegal reflective access operations WARNING: All illegal access operations will be denied in a future release ^C |
Now you can check what scan returned:
|
1 2 3 4 5 6 7 8 9 10 11 12 13 14 15 16 17 18 19 20 21 22 23 24 25 26 27 28 29 30 |
nosql@nosql:~/Pulpit/nosql2/hbase-2.5.0/bin$ cd ~ nosql@nosql:~$ ls -l razem 72 drwxr-xr-x 2 nosql hadoopuser 4096 lis 18 2021 Dokumenty -rw-r--r-- 1 nosql hadoopuser 28282 lis 26 2021 fireball.java drwxr-xr-x 2 nosql hadoopuser 4096 lis 18 2021 Muzyka drwxr-xr-x 2 nosql hadoopuser 4096 lis 2 16:53 Obrazy drwxr-xr-x 2 nosql hadoopuser 4096 paź 9 14:42 Pobrane drwxr-xr-x 2 nosql hadoopuser 4096 lis 18 2021 Publiczny drwxr-xr-x 5 nosql hadoopuser 4096 gru 3 21:47 Pulpit -rw-r--r-- 1 nosql hadoopuser 619 gru 3 21:54 res.txt drwx------ 5 nosql hadoopuser 4096 paź 22 22:13 snap drwxr-xr-x 2 nosql hadoopuser 4096 lis 18 2021 Szablony drwxr-xr-x 5 nosql hadoopuser 4096 gru 3 21:20 tmp drwxr-xr-x 2 nosql hadoopuser 4096 lis 18 2021 Wideo nosql@nosql:~$ cat res.txt HBase Shell Use "help" to get list of supported commands. Use "exit" to quit this interactive shell. For Reference, please visit: http://hbase.apache.org/2.0/book.html#shell Version 2.5.0, r2ecd8bd6d615ca49bfb329b3c0c126c80846d4ab, Tue Aug 23 15:58:57 UTC 2022 Took 0.0015 seconds hbase:001:0> scan 'test:table1' ROW COLUMN+CELL key002 column=f1:column_b, timestamp=2022-12-03T21:24:14.747, value=my_value_003 key005 column=f1:column_a, timestamp=2022-12-03T21:24:02.723, value=my_value_002 key010 column=f1:column_a, timestamp=2022-12-03T21:23:47.004, value=my_value_001 3 row(s) Took 0.7512 seconds hbase:002:0> |
If you need to load a lot of data, you may find interesting this material: Load data from hdfs to hbase
You may find useful the following documents:
In my case for develping Python code I use PyCharm. So as a first step open PyCharm, create a project named hbase_test and save it in your desktop directory (folder) (Pulpit in my case). Next you should install HappyBase module. Unfortunatelly it my case PyCharm failed to install HappyBase so I had to do (if it works for you, please skip the following set of commands):
|
1 2 3 4 5 6 |
nosql@nosql:~$ sudo apt-get update nosql@nosql:~$ sudo apt-get install gcc nosql@nosql:~$ sudo apt-get install python3-dev nosql@nosql:~$ source /home/nosql/Pulpit/hbase_test/venv/bin/activate (venv) nosql@nosql:~$ /home/nosql/Pulpit/hbase_test/venv/bin/python -m pip install --upgrade pip (venv) nosql@nosql:~$ /home/nosql/Pulpit/hbase_test/venv/bin/python /snap/pycharm-community/310/plugins/python-ce/helpers/packaging_tool.py install happybase |
Now HappyBase should be ready so you can run HBase and Thrift service you will use to communicate with HBase:
|
1 2 3 4 5 6 |
nosql@nosql:~/Pulpit/nosql2/hbase-2.5.0/bin$ ./stop-hbase.sh stopping hbase................ nosql@nosql:~/Pulpit/nosql2/hbase-2.5.0/bin$ ./hbase-daemon.sh start thrift running thrift, logging to /home/nosql/Pulpit/nosql2/hbase-2.5.0/bin/../logs/hbase-nosql-thrift-nosql.out nosql@nosql:~/Pulpit/nosql2/hbase-2.5.0/bin$ ./start-hbase.sh running master, logging to /home/nosql/Pulpit/nosql2/hbase-2.5.0/bin/../logs/hbase-nosql-master-nosql.out |
Finally use the following code to test simple interaction with your database:
|
1 2 3 4 5 6 7 8 9 10 11 12 13 14 15 16 17 18 19 20 21 22 23 24 25 26 |
import happybase def test(): connection = happybase.Connection(host='127.0.0.1', port=9090, autoconnect=True) print(connection.tables()) table = connection.table('test:table1') rows = table.rows([b'key005']) for key, data in rows: print(key, data) for k in data: print(k) print(data[k]) print(k.decode("utf-8")) s = data[k].decode("utf-8") print(s) print(s.encode('utf-8')) if __name__ == '__main__': test() |
After runing it from PyCharm, in terminal window you will see the following result:
|
1 2 3 4 5 6 7 8 9 10 |
/home/nosql/Pulpit/hbase_test/venv/bin/python /home/nosql/Pulpit/hbase_test/main.py [b'mytable', b'test:table1'] b'key005' {b'f1:column_a': b'my_value_002'} b'f1:column_a' b'my_value_002' f1:column_a my_value_002 b'my_value_002' Process finished with exit code 0 |