In this part you will learn how to use List view to present information in the form of a vertical list of rows as well as how to add, remove and reorder row entries.
Table of contents
- Introduction
- Project 1: static list
- Project 2: dynamic list
- Project 3: hierarchical informations
- Project 4: disclosure group
- Summary
- Step 1: create project
Create a new iOS project, as you did in Start Xcode and set up a project section of First application (SwiftUI) part and name it SwiftUI iOS Lists: - Step 2: create simple list
Open in editor the ContentView.swift and replaceContentViewstructure with:1234567891011121314struct ContentView: View {var body: some View {List {Text("Mytikas (Mount Olympus)")Text("Tubkal, Morocco")Text("Bolver - Lugli (Via Ferrata)")Text("Aconcagua")Text("Chachani")Text("Kang Yaze")Text("Kendlspitze")Text("Laserz-Klettersteig (Via Ferrata)")}}} - Step 3: modify list cell
Fortunatelly, you are not restricted to use only a single component as a list cell content. In fact, you can use any combination of components:123456789101112131415161718192021222324252627282930313233343536373839404142434445464748495051525354555657585960struct ContentView: View {var body: some View {List {VStack{HStack {Rectangle().fill(.yellow).frame(width: 30, height: 20).border(.black)Text("Mytikas (Mount Olympus)")Spacer()Text("2917").fontWeight(.bold)}HStack {Text("Greece").font(.subheadline).italic()Spacer()}}VStack{HStack {Rectangle().fill(.green).frame(width: 30, height: 20).border(.black)Text("Tubkal")Spacer()Text("4167").fontWeight(.bold)}HStack {Text("Morocco").font(.subheadline).italic()Spacer()}}VStack{HStack {Rectangle().fill(.orange).frame(width: 30, height: 20).border(.black)Text("Bolver - Lugli (Via Ferrata)")Spacer()Text("3192").fontWeight(.bold)}HStack {Text("Italy").font(.subheadline).italic()Spacer()}}}}}Above I made a new cell only for the first three peaks (cells) because of the code verbosity. You can significantly reduce code repetition with custom view:
123456789101112131415161718192021222324252627282930313233343536373839404142434445464748495051525354555657585960616263646566676869707172737475767778798081828384858687888990919293949596979899100101102103104105106107108enum Difficulty {case easy, moderate, difficult, hard}struct MountainCell: View {var name: Stringvar country: Stringvar elevation: Stringvar difficulty: Difficultyvar color: Color {get {if difficulty == .easy {return .green} else if difficulty == .moderate {return .yellow} else if difficulty == .difficult {return .orange} else if difficulty == .hard {return .red}return .white}}var body: some View {VStack{HStack {Rectangle().fill(color).frame(width: 30, height: 20).border(.black)Text(name)Spacer()Text(elevation).fontWeight(.bold)}HStack {Text(country).font(.subheadline).italic()Spacer()}}}}struct ContentView: View {var body: some View {List {MountainCell(name: "Mytikas (Mount Olympus)",country: "Greece",elevation: "2917",difficulty: .moderate)MountainCell(name: "Tubkal",country: "Morocco",elevation: "4167",difficulty: .easy)MountainCell(name: "Bolver - Lugli (Via Ferrata)",country: "Italy",elevation: "3192",difficulty: .difficult)MountainCell(name: "Aconcagua",country: "Argentina",elevation: "6961",difficulty: .hard)MountainCell(name: "Chachani",country: "Peru",elevation: "6075",difficulty: .difficult)MountainCell(name: "Kang Yaze",country: "India, Ladakh",elevation: "6239 (6496)",difficulty: .difficult)MountainCell(name: "Kendlspitze",country: "Austria",elevation: "3088",difficulty: .difficult)MountainCell(name: "Laserz-Klettersteig (Via Ferrata)",country: "Austria",elevation: "2568",difficulty: .difficult)}}} - Step 4: modify list cell style
You can also modify list cell style with:listRowSeparator()– hides a row separator;listRowSeparatorTint()– changes the color of a row separator;listRowBackground()– places a custom background view behind a list row item.
In the code given below I demonstrate how these modifiers works. Because I defined also a custom modifier, parts of code which stays unaffected compared to previously given code are "hidden" under the
[...]string:123456789101112131415161718192021222324252627282930313233343536373839404142434445464748495051525354555657585960616263646566676869707172737475767778798081828384858687888990919293949596979899100101102103104105enum Difficulty {[...]}struct MountainCell: View {[...]}struct Grayed: ViewModifier {let level: Doublefunc body(content: Content) -> some View {content.background(.clear).foregroundColor(.gray).opacity(level)}}extension View {func grayed(level: Double) -> some View {modifier(Grayed(level: level))}}struct ContentView: View {var body: some View {List {MountainCell(name: "Mytikas (Mount Olympus)",country: "Greece",elevation: "2917",difficulty: .moderate).listRowSeparator(.hidden)MountainCell(name: "Tubkal",country: "Morocco",elevation: "4167",difficulty: .easy).listRowSeparator(.hidden)MountainCell(name: "Bolver - Lugli (Via Ferrata)",country: "Italy",elevation: "3192",difficulty: .difficult).listRowSeparatorTint(.red)MountainCell(name: "Aconcagua",country: "Argentina",elevation: "6961",difficulty: .hard)MountainCell(name: "Chachani",country: "Peru",elevation: "6075",difficulty: .difficult).listRowSeparator(.hidden).listRowBackground(RoundedRectangle(cornerRadius: 5).grayed(level: 0.2))MountainCell(name: "Kang Yaze",country: "India, Ladakh",elevation: "6239 (6496)",difficulty: .difficult).listRowSeparator(.hidden).listRowBackground(RoundedRectangle(cornerRadius: 5).grayed(level: 0.005))MountainCell(name: "Kendlspitze",country: "Austria",elevation: "3088",difficulty: .difficult).listRowSeparator(.hidden).listRowBackground(RoundedRectangle(cornerRadius: 5).grayed(level: 0.2))MountainCell(name: "Laserz-Klettersteig (Via Ferrata)",country: "Austria",elevation: "2568",difficulty: .difficult).listRowSeparator(.hidden).listRowBackground(RoundedRectangle(cornerRadius: 5).grayed(level: 0.005))}}}
You considered a list as dynamic when it contains a set of items that can change over time be adding, editing or deleting its items.
To make it possible, each data element you want to display must be contained within a class or structure that conforms to the Identifiable protocol. This protocol requires that the instance contain a property named id which can be used to uniquely identify each item in the list. The id property can be any built-in Swift or even custom type that conforms to the Hashable protocol. Quite common is to use UUID as id:
- Step 1: cell data model
Open in editor the ContentView.swift and remove everything exceptContentView_Previewsstructure and initial importimport SwiftUI. Then first add definition of cell data model:12345struct Song: Identifiable {var id = UUID()var title: Stringvar artist: String}Next add new
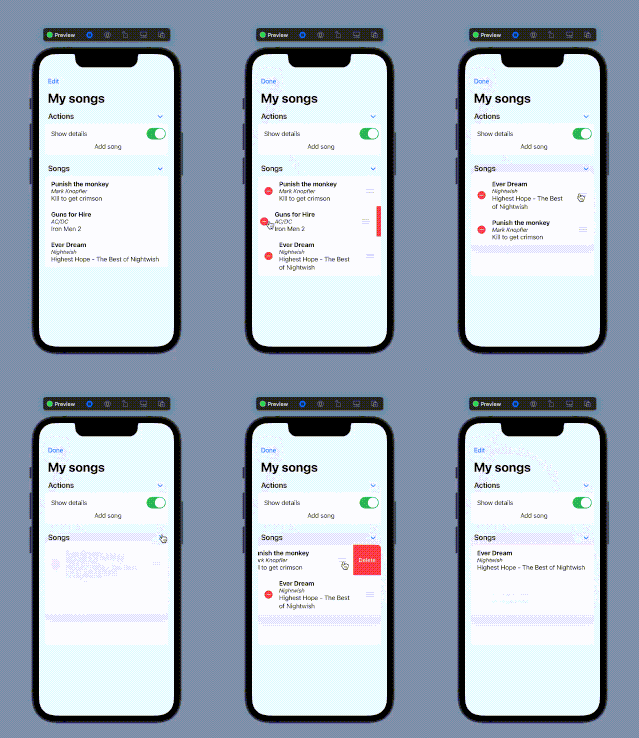
ContentViewstructure:1234567891011121314151617181920212223242526272829303132struct ContentView: View {@State var listSong: [Song] = [Song(title: "Punish the monkey",artist: "Mark Knopfler",album: "Kill to get crimson"),Song(title: "Guns for Hire",artist: "AC/DC",album: "Iron Men 2"),Song(title: "Ever Dream",artist: "Nightwish",album: "Highest Hope - The Best of Nightwish")]var body: some View {List(listSong) {item inVStack(alignment: .leading) {Text(item.title).fontWeight(.bold)Text(item.artist).font(.subheadline).italic()Text(item.album)}}}}When your will run this code, you will see:
- Step 2: mix static and dynamic content
12345678910111213141516171819202122232425262728struct ContentView: View {@State private var showDetails = true@State var listSong: [Song] = [...]var body: some View {List {Toggle(isOn: $showDetails) {Text("Show details")}ForEach (listSong) { item inVStack(alignment: .leading) {Text(item.title).fontWeight(.bold)if (showDetails) {Text(item.artist).font(.subheadline).italic()Text(item.album)}}}}}}
- Step 3: use sections to divide list content
Mixing in previous step static and dynamic content is not a good UI design. It would be better to separate smehow static part responsible for settings and dynamic part displaying informations. You can complet this withSectionview:1234567891011121314151617181920212223242526272829303132struct ContentView: View {@State private var showDetails = true@State var listSong: [Song] = [...]var body: some View {List {Section(header: Text("View options")) {Toggle(isOn: $showDetails) {Text("Show details")}}Section(header: Text("Songs")) {ForEach (listSong) { item inVStack(alignment: .leading) {Text(item.title).fontWeight(.bold)if (showDetails) {Text(item.artist).font(.subheadline).italic()Text(item.album)}}}}}}} - Step 4: add cells
123456789101112131415161718192021222324252627282930313233343536373839404142struct ContentView: View {@State private var showDetails = true@State var listSong: [Song] = [...]var body: some View {List {Section(header: Text("Actions")) {VStack {Toggle(isOn: $showDetails) {Text("Show details")}Button("Add song"){let n = listSong.countlistSong.append(Song(title: "Title \(n)",artist: "Artist",album: "Album \(n)"))}}}Section(header: Text("Songs")) {ForEach (listSong) { item inVStack(alignment: .leading) {Text(item.title).fontWeight(.bold)if (showDetails) {Text(item.artist).font(.subheadline).italic()Text(item.album)}}}}}}}
- Step 5: delete cells
1234567891011121314151617181920212223242526272829303132333435363738394041424344454647struct ContentView: View {@State private var showDetails = true@State var listSong: [Song] = [...]var body: some View {List {Section(header: Text("Actions")) {VStack {Toggle(isOn: $showDetails) {Text("Show details")}Button("Add song"){let n = listSong.countlistSong.append(Song(title: "Title \(n)",artist: "Artist",album: "Album \(n)"))}}}Section(header: Text("Songs")) {ForEach (listSong) { item inVStack(alignment: .leading) {Text(item.title).fontWeight(.bold)if (showDetails) {Text(item.artist).font(.subheadline).italic()Text(item.album)}}}.onDelete(perform: deleteItems)}}}func deleteItems(at offsets: IndexSet) {listSong.remove(atOffsets: offsets)}}Because
deleteItems(at:)function is very simple, you can define delete action as modifier (and removedeleteItems(at:)function):123.onDelete{offsets inlistSong.remove(atOffsets: offsets)} - Step 6: move cells
1234567891011121314151617181920212223242526272829303132333435363738394041424344454647484950515253545556575859606162636465666768697071struct ContentView: View {@State var isEditMode: Bool = false@State private var showDetails = true@State var listSong: [Song] = [Song(title: "Punish the monkey",artist: "Mark Knopfler",album: "Kill to get crimson"),Song(title: "Guns for Hire",artist: "AC/DC",album: "Iron Men 2"),Song(title: "Ever Dream",artist: "Nightwish",album: "Highest Hope - The Best of Nightwish")]var body: some View {VStack {Button(action: {isEditMode.toggle()}, label: {Text(isEditMode ? "Done" : "Edit")})List {Section(header: Text("Actions")) {VStack {Toggle(isOn: $showDetails) {Text("Show details")}Button("Add song"){let n = listSong.countlistSong.append(Song(title: "Title \(n)",artist: "Artist",album: "Album \(n)"))}}}Section(header: Text("Songs")) {ForEach (listSong) { item inVStack(alignment: .leading) {Text(item.title).fontWeight(.bold)if (showDetails) {Text(item.artist).font(.subheadline).italic()Text(item.album)}}}.onMove(perform: moveItem)}}.environment(\.editMode, .constant(isEditMode ? EditMode.active : EditMode.inactive))}}func moveItem(fromOffsets source: IndexSet, toOffset destination: Int) {listSong.move(fromOffsets: source, toOffset: destination)}}
Because
moveItem(fromOffsets:toOffset:)function is very simple, you can define move action as modifier (and removemoveItem(fromOffsets:toOffset:)function):123.onMove{source, destination inlistSong.move(fromOffsets: source, toOffset: destination)}In most cases Edit button is implemented as button located in navigation bar (so you have to wrapp the list into a navigation view):
123456789101112131415161718192021222324252627282930313233343536373839404142434445464748495051525354struct ContentView: View {@State private var showDetails = true@State var listSong: [Song] = [...]var body: some View {NavigationView {List {Section(header: Text("Actions")) {VStack {Toggle(isOn: $showDetails) {Text("Show details")}Button("Add song"){let n = listSong.countlistSong.append(Song(title: "Title \(n)",artist: "Artist",album: "Album \(n)"))}}}Section(header: Text("Songs")) {ForEach (listSong) { item inVStack(alignment: .leading) {Text(item.title).fontWeight(.bold)if (showDetails) {Text(item.artist).font(.subheadline).italic()Text(item.album)}}}.onDelete{offsets inlistSong.remove(atOffsets: offsets)}.onMove{source, destination inlistSong.move(fromOffsets: source, toOffset: destination)}}}.navigationTitle("My songs").toolbar {EditButton()}}}}If you replace
123.toolbar {EditButton()}with
1.navigationBarItems(leading: EditButton())you will get a little bit different behaviour:
- Step 1: cell data model
Open in editor the ContentView.swift and remove everything exceptContentView_Previewsstructure and initial importimport SwiftUI. Then first add definition of cell data model and all other associated data structures:1234567891011121314151617181920212223242526272829303132333435363738394041424344454647484950515253enum Difficulty {case easy, moderate, difficult, hardfunc toString() -> String{switch self{case .easy:return "easy"case .moderate:return "moderate"case .difficult:return "difficult"case .hard:return "hard"}}}enum TimeCommitment {case oneDay, upToThreeDays, longfunc toString() -> String{switch self{case .oneDay:return "oneDay"case .upToThreeDays:return "upToThreeDays"case .long:return "long"}}}enum DataType {case timeCommitment, difficulty, peakfunc toString() -> String{switch self{case .timeCommitment:return "timeCommitment"case .difficulty:return "difficulty"case .peak:return "peak"}}}struct Peak: Identifiable {var id = UUID()var type: DataTypevar data: [String: String]var children: [Peak]?}Next add new views and
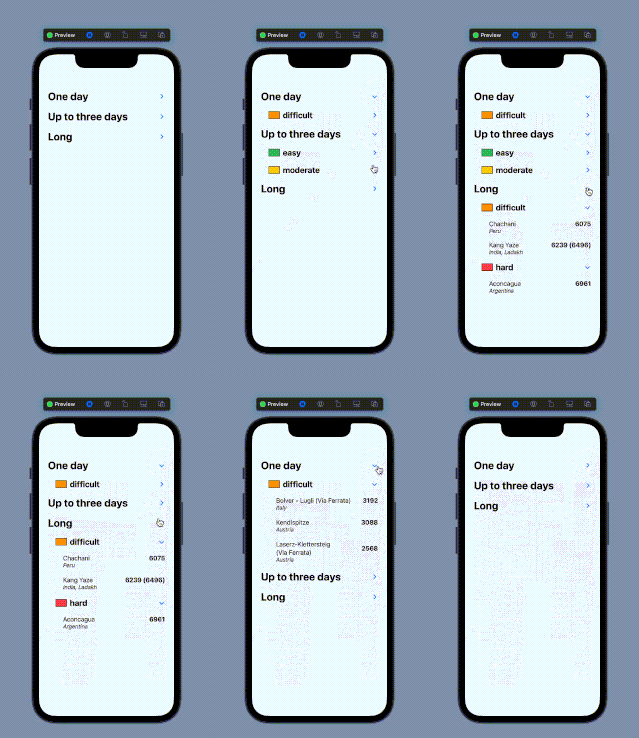
ContentViewstructure:123456789101112131415161718192021222324252627282930313233343536373839404142434445464748495051525354555657585960616263646566676869707172737475767778798081828384858687888990919293949596979899100101102103104105106107108109110111112113114115116117118119120121122123124125126127128129130131132133134135136137138139140141142143144145146147148149150151152153154155156157158159160161162163164165166167168169170171172173174175176177178179180181182183184185186187188189190191192193194195196197198199200201202203204205206207208209210struct ViewTimeCommitment: View {let timeCommitment: Stringvar body: some View {var name = "undefined"if timeCommitment == TimeCommitment.oneDay.toString() {name = "One day"} else if timeCommitment == TimeCommitment.upToThreeDays.toString() {name = "Up to three days"} else if timeCommitment == TimeCommitment.long.toString() {name = "Long"}return HStack {Text(name).font(.system(.title)).bold()}}}struct ViewDifficulty: View {let difficultyAsString: Stringvar body: some View {var color = Color.whiteif difficultyAsString == Difficulty.easy.toString() {color = .green} else if difficultyAsString == Difficulty.moderate.toString() {color = .yellow} else if difficultyAsString == Difficulty.difficult.toString() {color = .orange} else if difficultyAsString == Difficulty.hard.toString() {color = .red}return HStack {Rectangle().fill(color).frame(width: 30, height: 20).border(.black)Text(difficultyAsString).font(.system(.title2)).bold()Spacer()}}}struct ViewPeak: View {let name: Stringlet elevation: Stringlet country: Stringvar body: some View {VStack{HStack {Text(name)Spacer()Text(elevation).fontWeight(.bold)}HStack {Text(country).font(.subheadline).italic()Spacer()}}}}struct ContentView: View {@State var peaks: [Peak] = [Peak(type: .timeCommitment,data: [DataType.timeCommitment.toString(): TimeCommitment.oneDay.toString()],children: [Peak(type: .difficulty,data: [DataType.difficulty.toString(): Difficulty.difficult.toString()],children: [Peak(type: .peak,data: ["name": "Bolver - Lugli (Via Ferrata)","country": "Italy","elevation": "3192"]),Peak(type: .peak,data: ["name": "Kendlspitze","country": "Austria","elevation": "3088"]),Peak(type: .peak,data: ["name": "Laserz-Klettersteig (Via Ferrata)","country": "Austria","elevation": "2568"])])]) // End of one day trips,Peak(type: .timeCommitment,data: [DataType.timeCommitment.toString(): TimeCommitment.upToThreeDays.toString()],children: [Peak(type: .difficulty,data: [DataType.difficulty.toString(): Difficulty.easy.toString()],children: [Peak(type: .peak,data: ["name": "Tubkal","country": "Morocco","elevation": "4167"])]),Peak(type: .difficulty,data: [DataType.difficulty.toString(): Difficulty.moderate.toString()],children: [Peak(type: .peak,data: ["name": "Mytikas (Mount Olympus)","country": "Greece","elevation": "2917"])])]) // End of up to three days trips,Peak(type: .timeCommitment,data: [DataType.timeCommitment.toString(): TimeCommitment.long.toString()],children: [Peak(type: .difficulty,data: [DataType.difficulty.toString(): Difficulty.difficult.toString()],children: [Peak(type: .peak,data: ["name": "Chachani","country": "Peru","elevation": "6075"]),Peak(type: .peak,data: ["name": "Kang Yaze","country": "India, Ladakh","elevation": "6239 (6496)"])]),Peak(type: .difficulty,data: [DataType.difficulty.toString(): Difficulty.hard.toString()],children: [Peak(type: .peak,data: ["name": "Aconcagua","country": "Argentina","elevation": "6961"])])]) // End of long trips]var body: some View {List(peaks, children: \.children) {item inif item.type == .timeCommitment {ViewTimeCommitment(timeCommitment: item.data[DataType.timeCommitment.toString()]!)} else if item.type == .difficulty {ViewDifficulty(difficultyAsString: item.data[DataType.difficulty.toString()]!)} else if item.type == .peak {ViewPeak(name: item.data["name"]!,elevation: item.data["elevation"]!,country: item.data["country"]!)}}.listStyle(SidebarListStyle())}}When your will run this code, you will see:
If you comment
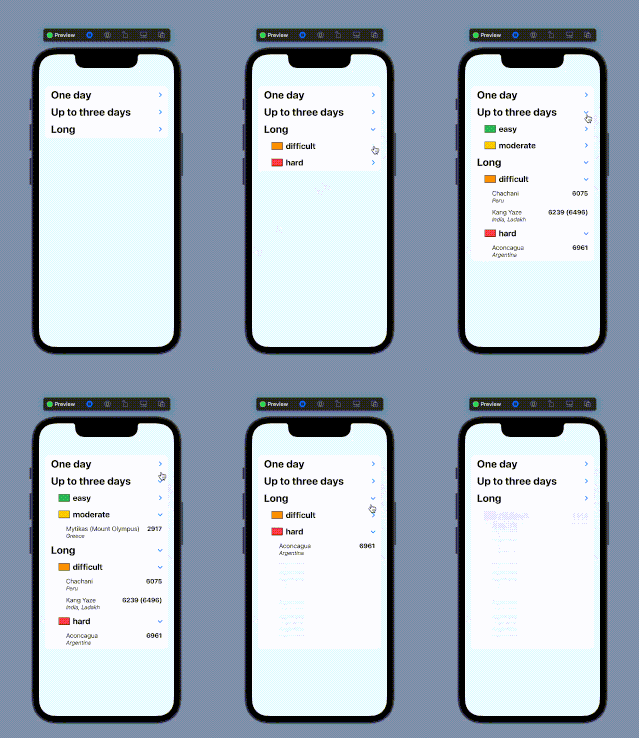
.listStyle(SidebarListStyle())modifier, you will see default list:
- Step 1: use
DisclosureGroupview
Open in editor the ContentView.swift and remove everything exceptContentView_Previewsstructure and initial importimport SwiftUI. Then paste the following code:123456789101112131415161718192021222324252627282930struct ContentView: View {var body: some View {VStack {DisclosureGroup("Level 1.1") {VStack {DisclosureGroup("Level 2.1") {Text("Item 1.1-2.1-1")Text("Item 1.1-2.1-2")}DisclosureGroup("Level 2.2") {Text("Item 1.1-2.2-1")Text("Item 1.1-2.2-2")}}}DisclosureGroup("Level 1.2") {VStack {DisclosureGroup("Level 2.1") {Text("Item 1.2-2.1-1")Text("Item 1.2-2.1-2")}DisclosureGroup("Level 2.2") {Text("Item 1.2-2.2-1")Text("Item 1.2-2.2-2")}}}}}}When your will run this code, you will see:
In this part you learned how to create lists, manage their content by add, move or remove items and how to create hierarchical lists.
The key points of this part are:
- How to create basic list with static elements.
- How to create dynamic list and add, remove or reorder row entries.
- How to display hierarchical informations.
- How to use disclosure group to show or hide another content view, based on the state of a disclosure control.


