
In this part we cover the following topics:
First we should be familiar with the rail fence cipher
- Rail fence cipher (in English)
- W poszukiwaniu szyfru idealnego, subsection Szyfr płotkowy (in Polish)
Our task is to implement distributed system to break rail fence cipher. Encrypted text is in hidden.txt file. In addition to this there are other files:
- dictionary.txt dictionary -- set of words we can find in plain text;
- plain.txt plain text (only to verify if the result of breaking process is correct);
- fence_cipher.py script used to prepare ciphered data -- for reference and verification if encryption process was correct. This script was also used to encrypt two basic messages.
123456789101112131415161718192021Message 1:Plain text:ABCDEFGHIJKLMNOPQREncrpypted with parameters R=4, O=0 (R - number of rows, O - offset):AGMSBFHLNRCEIKOQDJPEncrpypted with parameters R=4, O=2:EKQDFJLPRACGIMOSBHNMessage 2:Plain text:ALA_MA_KOTA_TO_JEST_KOT_ALI_KOT_LUBI_MLEKOEncrpypted with parameters R=6, O=0:AAKTKLT__OO_EOAOTTTKLL_KOS__UMM__EAIB_AJLIEncrpypted with parameters R=6, O=7:_O_UAMT_TALBLA_JOL_IOA_AEKIT_KKTS__OMEOTKL
This task should be solved based either on this tutorial or Task queues with Celery.
- Part 1: RabbitMQ for beginners - What is RabbitMQ?
- Part 2: RabbitMQ for beginners - Sample code
- Part 3: The RabbitMQ Management Interface
- Part 4: RabbitMQ Exchanges, routing keys and bindings
- AMQP 0-9-1 Model Explained
- RabbitMQ – Direct Exchange (good example in Java)
- RabbitMQ – Fanout Exchange (good example in Java)
- RabbitMQ – Topic Exchange (good example in Java)
- RabbitMQ – Headers Exchange (good example in Java)
- RabbitMQ: A Cloud based Message Oriented Middleware
RabbitMQ is described as a message broker software. General discussion about message queues is presented in a separate Message queue tutorial. As we can read there, we can think about message broker as a one of messaging system component. On the other hand, now it is quite common to use term message broker in a whole messaging system meaning. Very generally a message broker is understood as a computer program module that translates a message from the formal messaging protocol of the sender to the formal messaging protocol of the receiver. The primary purpose of a broker is to take incoming messages from applications and perform some action on them like validate, transform and route.
Many of RabbitMQ’s features are a simple consequence of implementing the AMQP specification. Unlike many other protocols like HTTP and SMTP, the AMQP defines not only a network protocol but also server-side services and behaviors. That is why we can refer to this in much broader sense as the Advanced Message Queuing (AMQ) model. This model logically defines three abstract components in broker software that define the routing behavior of messages: queue, exchange, and binding.
Queue is the simplest component of AMQ model. It is a data structure beeing responsible for storing received messages which may also contain some configuration information that defines what should be done with a message. A queue may hold messages in RAM only, or it may persist them to disk prior to delivering them in first-in, first-out (FIFO) order.
Exchange is the component of the message broker that routes messages to queues. The core idea in the messaging model in RabbitMQ is that the producer never sends any messages directly to a queue. Actually, quite often the producer doesn't even know if a message will be delivered to any queue at all. Instead, the producer can only send messages to an exchange. An exchange receives messages sent into RabbitMQ from producers and determines if and how pushes them to queues. Exchanges define the routing behaviors that are applied to messages, usually by examining data attributes passed along with the message or that are contained within the message’s properties. The exchange must know exactly what to do with a message it receives. Should it be appended to a particular queue? Should it be appended to many queues? Or should it get discarded. The rules for that are defined by the exchange type.
There are a few exchange types available: default, direct, fanout, topic, and headers.
- Default Default or nameless exchange is identified by the empty string (
""). In this case messages are routed to the queue with the name specified byrouting_key, if this queue exists. - Direct In this setup, we directly specify to which queue our messages should be delivered to. For example, let's assume that we have one exchange
Xwith two queues bound to it. The first queue,Q1, is bound with two bindings, one withrouting_keytaking a valueAandBwhile the second,Q2, has two bindings, one withrouting_keytaking a valueCand the other one withB.In such a setup a message published to the exchange with a routing key
Awill be routed to queueQ1. Messages with a routing key ofCwill go toQ2while messages with a routing key ofBwill go both toQ1andQ2. All other messages will be discarded. As we can see it's perfect legal to use the same binding (routing_key; it is quite common in RabbitMQ documentation to use term binding key instead of routing key) for more than one queue. - Fanout The fanout exchange is very simple: it just mindlessly broadcasts all the messages it receives to all the queues it knows. The fanout exchanges simply ignore
routing_keyvalue. - Topic Messages sent to a topic exchange can't have an arbitrary
routing_key. Instead it must be a list of words, delimited by dots. The words can be anything, but usually they specify some hierarchically ordered (structured) features connected to the message. For example the messages may be sent with arouting_keythat consists of four words and three dots of general form1[LOCATION].[LOCATION_DETAILS].[SENSOR_TYPE].[PARAMETER]in particular
1home.kitchen.dht22.temperature_cThere can be as many words in the routing key as we like, up to the limit of 255 bytes.
There are two important special cases for binding keys:
*(star) can substitute for exactly one word.#(hash) can substitute for zero or more words.
With this special cases
*.*.dht22.*means: all DHT22 sensors regardless of their location and parameter type;home.#means: all sensors located at home regardless of their type, precise location and parameter type.
Topic exchange is the most versatile exchange and can behave like all aforementioned exchanges.
- When a queue is bound with
#(hash) binding key -- it will receive all the messages, regardless of the routing key -- like in fanout exchange. - When special characters
*(star) and#(hash) aren't used in bindings, the topic exchange will behave just like a direct one.
- Headers
!!! todo !!!
!!! todo !!!
Binding - A rule that tells the exchange which queue the messages should be
stored in
!!!A binding is a relationship between an exchange and a queue. This can be simply read as: the queue is interested in messages from this exchange.
The meaning of a binding key depends on the exchange type. The fanout exchanges, which we used previously, simply ignored its value.
!!! todo !!!
A single AMQP connection can have multiple channels
!!! todo !!!
How to install RabbitMQ is beeing described in many different web pages, but all of them do it (a little bit) different way:
- How To Install RabbitMQ on Ubuntu 16.04
- How to Install RabbitMQ Server on Ubuntu 18.04 & 16.04 LTS
- How to install Latest RabbitMQ Server on Ubuntu 18.04 LTS
In this section I describe how I did it.
- Install Erlang.
RabbitMQ is written in Erlang so we have to install it as a first component. To do this we have to use the following commands
123456ubd@ubd-virtual-machine:~/Pulpit$ wget https://packages.erlang-solutions.com/erlang-solutions_1.0_all.deb[...]ubd@ubd-virtual-machine:~/Pulpit$ sudo dpkg -i erlang-solutions_1.0_all.deb[...]ubd@ubd-virtual-machine:~/Pulpit$ sudo apt-get install erlang erlang-nox[...] - Install RabbitMQ.
Having Erlang installed we can procede with RAbbitMQ instalation.
123456ubd@ubd-virtual-machine:~$ wget -O - "https://packagecloud.io/rabbitmq/rabbitmq-server/gpgkey" | sudo apt-key add -[...]ubd@ubd-virtual-machine:~$ curl -s https://packagecloud.io/install/repositories/rabbitmq/rabbitmq-server/script.deb.sh | sudo bash[...]ubd@ubd-virtual-machine:~/Pulpit$ sudo apt-get install -y rabbitmq-server[...]
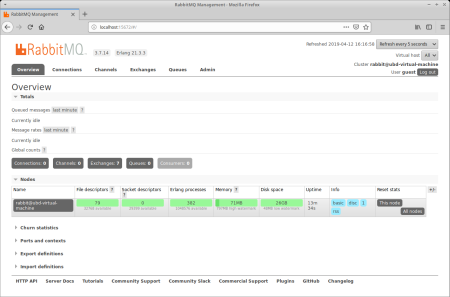
After installation, RabbitMQ service is started and enabled to start on boot. To check the status, run:
123456789101112131415161718192021222324ubd@ubd-virtual-machine:~/Pulpit$ sudo systemctl status rabbitmq-server.service● rabbitmq-server.service - RabbitMQ brokerLoaded: loaded (/lib/systemd/system/rabbitmq-server.service; enabled; vendor preset: enabled)Active: active (running) since Fri 2019-04-12 16:03:31 CEST; 2min 40s agoMain PID: 28692 (beam.smp)Status: "Initialized"Tasks: 85 (limit: 2341)CGroup: /system.slice/rabbitmq-server.service├─28692 /usr/lib/erlang/erts-10.3.2/bin/beam.smp -W w -A 64 -MBas ageffcbf -MHas ageffcbf -MBlmbcs 512 -MHlmbcs 512 -MMmcs 30 -P 1048576 -t├─28777 /usr/lib/erlang/erts-10.3.2/bin/epmd -daemon├─28921 erl_child_setup 32768├─28945 inet_gethost 4└─28946 inet_gethost 4kwi 12 16:03:22 ubd-virtual-machine rabbitmq-server[28692]: ## ##kwi 12 16:03:22 ubd-virtual-machine rabbitmq-server[28692]: ## ## RabbitMQ 3.7.14. Copyright (C) 2007-2019 Pivotal Software, Inc.kwi 12 16:03:22 ubd-virtual-machine rabbitmq-server[28692]: ########## Licensed under the MPL. See https://www.rabbitmq.com/kwi 12 16:03:22 ubd-virtual-machine rabbitmq-server[28692]: ###### ##kwi 12 16:03:22 ubd-virtual-machine rabbitmq-server[28692]: ########## Logs: /var/log/rabbitmq/rabbit@ubd-virtual-machine.logkwi 12 16:03:22 ubd-virtual-machine rabbitmq-server[28692]: /var/log/rabbitmq/rabbit@ubd-virtual-machine_upgrade.logkwi 12 16:03:22 ubd-virtual-machine rabbitmq-server[28692]: Starting broker...kwi 12 16:03:31 ubd-virtual-machine rabbitmq-server[28692]: systemd unit for activation check: "rabbitmq-server.service"kwi 12 16:03:31 ubd-virtual-machine systemd[1]: Started RabbitMQ broker.kwi 12 16:03:33 ubd-virtual-machine rabbitmq-server[28692]: completed with 0 plugins. - We can optionally enable the RabbitMQ Management Web dashboard for easy management.
1234567891011121314ubd@ubd-virtual-machine:~/Pulpit$ sudo rabbitmq-plugins enable rabbitmq_managementEnabling plugins on node rabbit@ubd-virtual-machine:rabbitmq_managementThe following plugins have been configured:rabbitmq_managementrabbitmq_management_agentrabbitmq_web_dispatchApplying plugin configuration to rabbit@ubd-virtual-machine...The following plugins have been enabled:rabbitmq_managementrabbitmq_management_agentrabbitmq_web_dispatchstarted 3 plugins.
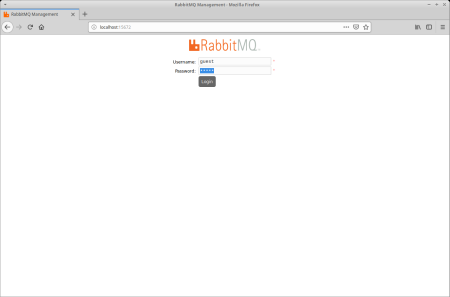
Uselocalhost:15672URL to display a web interface's login screen
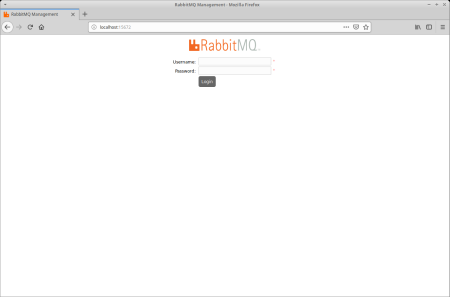
Useguestas login and password to get an access to the web interface
- Install
pikawhich is the Python client recommended by the RabbitMQ team to use
123ubd@ubd-virtual-machine:~/anaconda3/bin$ conda activate test_env(test_env) ubd@ubd-virtual-machine:~/anaconda3/bin$ conda install -c conda-forge pika[...]


- Activate working environment
12ubd@ubd-virtual-machine:~$ conda activate test_env(test_env) ubd@ubd-virtual-machine:~$ - Crate directories hierarchy
1234(test_env) ubd@ubd-virtual-machine:~/anaconda3/bin$ cd ~/Pulpit/code/(test_env) ubd@ubd-virtual-machine:~/Pulpit/code$ mkdir rabbitmq(test_env) ubd@ubd-virtual-machine:~/Pulpit/code$ cd rabbitmq/(test_env) ubd@ubd-virtual-machine:~/Pulpit/code/rabbitmq$ mkdir exchange_default - In
exchange_defaultdirectory create theproducer.pyandconsumer.pyfiles
12345678910111213141516171819202122232425262728#!/home/ubd/anaconda3/envs/test_env/bin/pythonimport pikaimport sysif len(sys.argv) != 3:print("Call syntax: python SCRIPT_NAME PRODUCER_NAME MESSAGE_STRING")exit()producerName = sys.argv[1]messageText = sys.argv[2]connection = pika.BlockingConnection(pika.ConnectionParameters(host='localhost'))channel = connection.channel()channel.queue_declare(queue='task',durable=True)channel.basic_publish(exchange='',routing_key='task',body=messageText,properties=pika.BasicProperties(delivery_mode=2, # make message persistent))print("Producer name: %s, message text:%s" % (producerName, message))connection.close()
1234567891011121314151617181920212223242526272829303132333435363738394041424344454647484950#!/home/ubd/anaconda3/envs/test_env/bin/pythonimport pikafrom random import randintimport sysimport timeif len(sys.argv) < 2:print("Call syntax: python SCRIPT_NAME CONSUMER_NAME [DEFAULT_WORKING_TIME]")exit()consumerName = sys.argv[1]defaultWorkingTime = 0if len(sys.argv) == 3:try:defaultWorkingTime = int(sys.argv[2])except Exception as ex:passprint("Consumer: %s with defaultWorkingTime=%s" % (consumerName, defaultWorkingTime if defaultWorkingTime>0 else 'RANDOM'))def callback(channel, method, properties, body):if defaultWorkingTime == 0:workingTime = randint(1,10)else:workingTime = defaultWorkingTimeprint("Consumer %s, working time: %s" % (consumerName, workingTime))print("Channel %r" % channel)print("Method %r" % method)print("Properties %r" % properties)print("Body %r" % body)print ("Start: %s" % time.ctime())time.sleep(workingTime)print ("Done: %s" % time.ctime())channel.basic_ack(delivery_tag=method.delivery_tag)connection = pika.BlockingConnection(pika.ConnectionParameters(host='localhost'))channel = connection.channel()channel.queue_declare(queue='task', durable=True)print("Waiting for messages. To exit press CTRL+C")channel.basic_qos(prefetch_count=1)channel.basic_consume(queue='task', on_message_callback=callback)channel.start_consuming() - Run producer
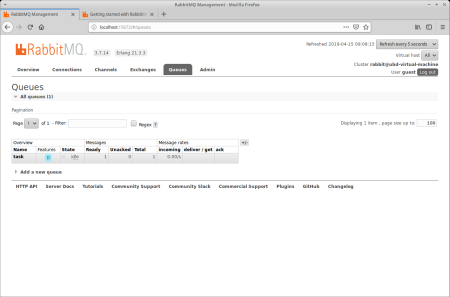
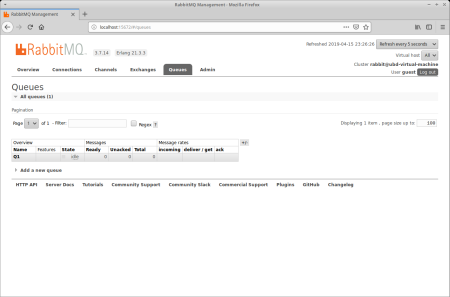
12(test_env) ubd@ubd-virtual-machine:~/Pulpit/code/rabbitmq/exchange_default$ python producer.py P1 'Test message from P1'Producer name: P1, message text:Test message from P1
and verify in web console that some data has beed received.
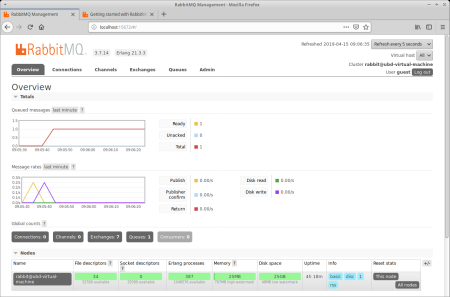
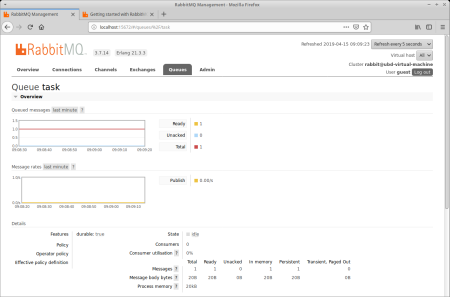
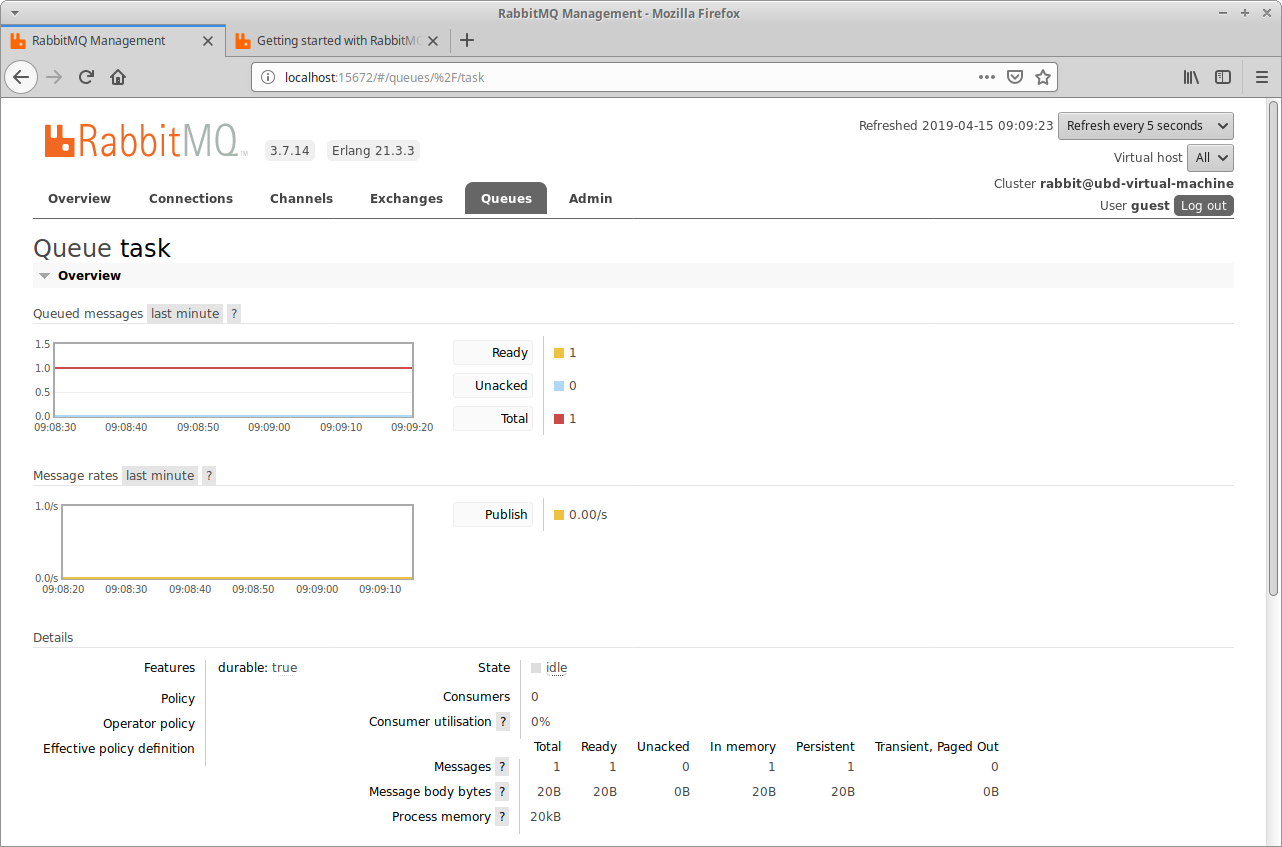
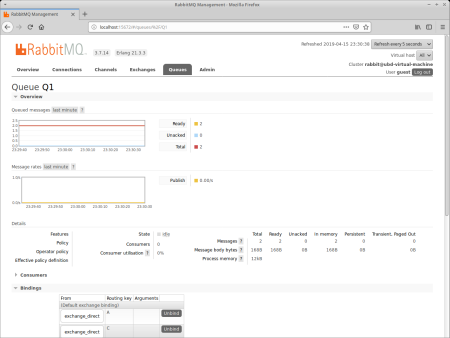
Verifytaskqueue status after clik on its name
- Run consumer
12345678910(test_env) ubd@ubd-virtual-machine:~/Pulpit/code/rabbitmq/exchange_default$ python consumer.py C1Consumer: C1 with defaultWorkingTime=RANDOMWaiting for messages. To exit press CTRL+CConsumer C1, working time: 7Channel <BlockingChannel impl=<Channel number=1 OPEN conn=<SelectConnection OPEN transport=<pika.adapters.utils.io_services_utils._AsyncPlaintextTransport object at 0x7f6a869524a8> params=<ConnectionParameters host=localhost port=5672 virtual_host=/ ssl=False>>>>Method <Basic.Deliver(['consumer_tag=ctag1.a8f67c119aa049bdb9352033aa2e82a3', 'delivery_tag=1', 'exchange=', 'redelivered=False', 'routing_key=task'])>Properties <BasicProperties(['delivery_mode=2'])>Body b'Test message from P1'Start: Mon Apr 15 09:48:10 2019Done: Mon Apr 15 09:48:17 2019
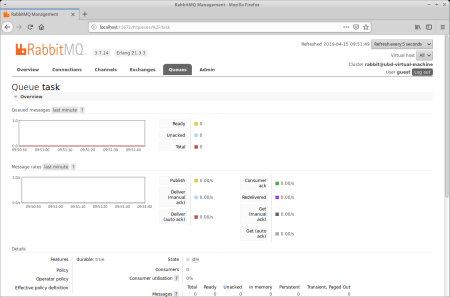
and verify in web console that messages keept intaskqueue have been consumed
- Instead of a simple text we can send JSON structures as a message. To do this, use the following slightly modified
producer.pyandconsumer.pycode
1234567891011121314151617181920212223242526272829303132333435#!/home/ubd/anaconda3/envs/test_env/bin/pythonimport jsonimport pikaimport sysif len(sys.argv) != 3:print("Call syntax: python SCRIPT_NAME PRODUCER_NAME MESSAGE_STRING")exit()producerName = sys.argv[1]messageText = sys.argv[2]connection = pika.BlockingConnection(pika.ConnectionParameters(host='localhost'))channel = connection.channel()channel.queue_declare(queue='task',durable=True)data = {"producerName": producerName,"messageText": messageText}message = json.dumps(data)channel.basic_publish(exchange='',routing_key='task',body=message,properties=pika.BasicProperties(delivery_mode=2, # make message persistent))print("Producer name: %s, message text:%s" % (producerName, message))connection.close()
123456789101112131415161718192021222324252627282930313233343536373839404142434445464748495051525354#!/home/ubd/anaconda3/envs/test_env/bin/pythonimport jsonimport pikafrom random import randintimport sysimport timeif len(sys.argv) < 2:print("Call syntax: python SCRIPT_NAME CONSUMER_NAME [DEFAULT_WORKING_TIME]")exit()consumerName = sys.argv[1]defaultWorkingTime = 0if len(sys.argv) == 3:try:defaultWorkingTime = int(sys.argv[2])except Exception as ex:passprint("Consumer: %s with defaultWorkingTime=%s" % (consumerName, defaultWorkingTime if defaultWorkingTime>0 else 'RANDOM'))def callback(channel, method, properties, body):if defaultWorkingTime == 0:workingTime = randint(1,10)else:workingTime = defaultWorkingTimeprint("Consumer %s, working time: %s" % (consumerName, workingTime))print("Channel %r" % channel)print("Method %r" % method)print("Properties %r" % properties)print("Body %r" % body)data = json.loads(body)for key in data:print ("key=%s value=%s" % (key, data[key]))print ("Start: %s" % time.ctime())time.sleep(workingTime)print ("Done: %s" % time.ctime())channel.basic_ack(delivery_tag=method.delivery_tag)connection = pika.BlockingConnection(pika.ConnectionParameters(host='localhost'))channel = connection.channel()channel.queue_declare(queue='task', durable=True)print("Waiting for messages. To exit press CTRL+C")channel.basic_qos(prefetch_count=1)channel.basic_consume(queue='task', on_message_callback=callback)channel.start_consuming()
While testing, results similar to the following should be displayed
1234567891011121314(test_env) ubd@ubd-virtual-machine:~/Pulpit/code/rabbitmq/exchange_default/json_version$ python producer.py P1 'Test message from P1'Producer name: P1, message text:{"producerName": "P1", "messageText": "Test message from P1"}(test_env) ubd@ubd-virtual-machine:~/Pulpit/code/rabbitmq/exchange_default/json_version$ python consumer.py C1Consumer: C1 with defaultWorkingTime=RANDOMWaiting for messages. To exit press CTRL+CConsumer C1, working time: 3Channel <BlockingChannel impl=<Channel number=1 OPEN conn=<SelectConnection OPEN transport=<pika.adapters.utils.io_services_utils._AsyncPlaintextTransport object at 0x7f04138cd390> params=<ConnectionParameters host=localhost port=5672 virtual_host=/ ssl=False>>>>Method <Basic.Deliver(['consumer_tag=ctag1.4e98fe8c3a504cd1b77ff61586946bdb', 'delivery_tag=1', 'exchange=', 'redelivered=True', 'routing_key=task'])>Properties <BasicProperties(['delivery_mode=2'])>Body b'{"producerName": "P1", "messageText": "Test message from P1"}'key=producerName value=P1key=messageText value=Test message from P1Start: Mon Apr 15 10:08:44 2019Done: Mon Apr 15 10:08:47 2019


- Create the
producer.py,queue.pyandconsumer.pyfiles with the following contents
12345678910111213141516171819202122232425262728293031323334#!/home/ubd/anaconda3/envs/test_env/bin/pythonimport jsonimport pikaimport sysif len(sys.argv) != 3:print("Call syntax: python SCRIPT_NAME PRODUCER_NAME MESSAGE_STRING")exit()producerName = sys.argv[1]messageText = sys.argv[2]connection = pika.BlockingConnection(pika.ConnectionParameters(host='localhost'))channel = connection.channel()channel.exchange_declare(exchange='exchange_fanout', exchange_type='fanout')data = {"producerName": producerName,"messageText": messageText}message = json.dumps(data)channel.basic_publish(exchange='exchange_fanout',routing_key='',body=message,properties=pika.BasicProperties(delivery_mode=2,))print("Producer name: %s, message text:%s" % (producerName, message))connection.close()
1234567891011121314151617181920212223#!/home/ubd/anaconda3/envs/test_env/bin/pythonimport pikaimport sysif len(sys.argv) != 2:print("Call syntax: python SCRIPT_NAME QUEUE_NAME")exit()queueName = sys.argv[1]connection = pika.BlockingConnection(pika.ConnectionParameters(host='localhost'))channel = connection.channel()channel.exchange_declare(exchange='exchange_fanout', exchange_type='fanout')channel.queue_declare(queueName)channel.queue_bind(exchange='exchange_fanout',queue=queueName)print("Queue: %s" % (queueName))
1234567891011121314151617181920212223242526272829303132333435#!/home/ubd/anaconda3/envs/test_env/bin/pythonimport jsonimport pikaimport sysif len(sys.argv) != 3:print("Call syntax: python SCRIPT_NAME CONSUMER_NAME QUEUE_NAME")exit()consumerName = sys.argv[1]queueName = sys.argv[2]def callback(channel, method, properties, body):print("Consumer %s" % (consumerName))print("Channel %r" % channel)print("Method %r" % method)print("Properties %r" % properties)print("Body %r" % body)data = json.loads(body)for key in data:print ("key=%s value=%s" % (key, data[key]))connection = pika.BlockingConnection(pika.ConnectionParameters(host='localhost'))channel = connection.channel()print("Consumer: %s" % (consumerName))print("Waiting for messages. To exit press CTRL+C")channel.basic_consume(queue=queueName,on_message_callback=callback,auto_ack=True)channel.start_consuming() - We will make a following queues setup
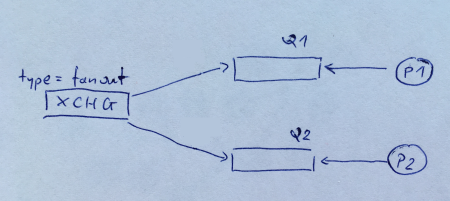
In
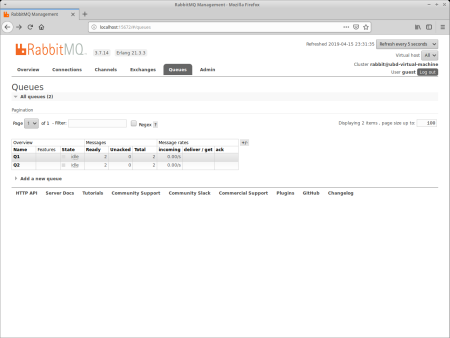
Terminal 1runqueue.pyscript12(test_env) ubd@ubd-virtual-machine:~/Pulpit/code/rabbitmq/exchange_fanout$ python queue.py Q1Queue: Q1and
consumer.pyscript.123(test_env) ubd@ubd-virtual-machine:~/Pulpit/code/rabbitmq/exchange_fanout$ python consumer.py C1 Q1Consumer: C1Waiting for messages. To exit press CTRL+C - Do the same in
Terminal 2: runqueue.pyscript12(test_env) ubd@ubd-virtual-machine:~/Pulpit/code/rabbitmq/exchange_fanout$ python queue.py Q2Queue: Q2and
consumer.pyscript.123(test_env) ubd@ubd-virtual-machine:~/Pulpit/code/rabbitmq/exchange_fanout$ python consumer.py C2 Q2Consumer: C2Waiting for messages. To exit press CTRL+C - Use
producer.pyscript to add messages to the queues -- run it inTerminal 3.12(test_env) ubd@ubd-virtual-machine:~/Pulpit/code/rabbitmq/exchange_fanout$ python producer.py P1 'Message 1 from producer P1'Producer name: P1, message text:{"producerName": "P1", "messageText": "Message 1 from producer P1"}and verify consumer's output:
- in
Terminal 1
1234567Consumer C1Channel <BlockingChannel impl=<Channel number=1 OPEN conn=<SelectConnection OPEN transport=<pika.adapters.utils.io_services_utils._AsyncPlaintextTransport object at 0x7f632e8bc1d0> params=<ConnectionParameters host=localhost port=5672 virtual_host=/ ssl=False>>>>Method <Basic.Deliver(['consumer_tag=ctag1.c129b3c664f04aa78ad71cad7449410d', 'delivery_tag=1', 'exchange=exchange_fanout', 'redelivered=False', 'routing_key='])>Properties <BasicProperties(['delivery_mode=2'])>Body b'{"producerName": "P1", "messageText": "Message 1 from producer P1"}'key=producerName value=P1key=messageText value=Message 1 from producer P1 - in
Terminal 2
1234567Consumer C2Channel <BlockingChannel impl=<Channel number=1 OPEN conn=<SelectConnection OPEN transport=<pika.adapters.utils.io_services_utils._AsyncPlaintextTransport object at 0x7f309ff88e48> params=<ConnectionParameters host=localhost port=5672 virtual_host=/ ssl=False>>>>Method <Basic.Deliver(['consumer_tag=ctag1.ad3a1734db764e6f8414532d752e1ca0', 'delivery_tag=1', 'exchange=exchange_fanout', 'redelivered=False', 'routing_key='])>Properties <BasicProperties(['delivery_mode=2'])>Body b'{"producerName": "P1", "messageText": "Message 1 from producer P1"}'key=producerName value=P1key=messageText value=Message 1 from producer P1
- in
- Again use
producer.pyscript to add messages to the queues -- run it inTerminal 3.
12(test_env) ubd@ubd-virtual-machine:~/Pulpit/code/rabbitmq/exchange_fanout$ python producer.py P1 'Message 2 from producer P1'Producer name: P1, message text:{"producerName": "P1", "messageText": "Message 2 from producer P1"}}
and verify consumer's output:- in
Terminal 1
1234567Consumer C1Channel <BlockingChannel impl=<Channel number=1 OPEN conn=<SelectConnection OPEN transport=<pika.adapters.utils.io_services_utils._AsyncPlaintextTransport object at 0x7f632e8bc1d0> params=<ConnectionParameters host=localhost port=5672 virtual_host=/ ssl=False>>>>Method <Basic.Deliver(['consumer_tag=ctag1.c129b3c664f04aa78ad71cad7449410d', 'delivery_tag=2', 'exchange=exchange_fanout', 'redelivered=False', 'routing_key='])>Properties <BasicProperties(['delivery_mode=2'])>Body b'{"producerName": "P1", "messageText": "Message 2 from producer P1"}'key=producerName value=P1key=messageText value=Message 2 from producer P1 - in
Terminal 2
1234567Consumer C2Channel <BlockingChannel impl=<Channel number=1 OPEN conn=<SelectConnection OPEN transport=<pika.adapters.utils.io_services_utils._AsyncPlaintextTransport object at 0x7f309ff88e48> params=<ConnectionParameters host=localhost port=5672 virtual_host=/ ssl=False>>>>Method <Basic.Deliver(['consumer_tag=ctag1.ad3a1734db764e6f8414532d752e1ca0', 'delivery_tag=2', 'exchange=exchange_fanout', 'redelivered=False', 'routing_key='])>Properties <BasicProperties(['delivery_mode=2'])>Body b'{"producerName": "P1", "messageText": "Message 2 from producer P1"}'key=producerName value=P1key=messageText value=Message 2 from producer P1
- in

- Create a new
exchange_directdirectory. - Create the
producer.py,queue.pyandconsumer.pyfiles with the following contents
123456789101112131415161718192021222324252627282930313233343536#!/home/ubd/anaconda3/envs/test_env/bin/pythonimport jsonimport pikaimport sysif len(sys.argv) != 4:print("Call syntax: python SCRIPT_NAME PRODUCER_NAME ROUTING_KEY MESSAGE_STRING")exit()producerName = sys.argv[1]routingKey = sys.argv[2]messageText = sys.argv[3]connection = pika.BlockingConnection(pika.ConnectionParameters(host='localhost'))channel = connection.channel()channel.exchange_declare(exchange='exchange_direct', exchange_type='direct')data = {"producerName": producerName,"routingKey": routingKey,"messageText": messageText}message = json.dumps(data)channel.basic_publish(exchange='exchange_direct',routing_key=routingKey,body=message,properties=pika.BasicProperties(delivery_mode=2,))print("Producer name: %s, routing key: %s, message text:%s" % (producerName, routingKey, message))connection.close()
1234567891011121314151617181920212223242526#!/home/ubd/anaconda3/envs/test_env/bin/pythonimport pikaimport sysif len(sys.argv) < 3:print("Call syntax: python SCRIPT_NAME QUEUE_NAME ROUTING_KEYS")exit()queueName = sys.argv[1]routingKeys = sys.argv[2:]connection = pika.BlockingConnection(pika.ConnectionParameters(host='localhost'))channel = connection.channel()channel.exchange_declare(exchange='exchange_direct', exchange_type='direct')channel.queue_declare(queueName)for routingKey in routingKeys:channel.queue_bind(exchange='exchange_direct',queue=queueName,routing_key=routingKey)print("Queue: %s with routingKey: %s" % (queueName, routingKey))
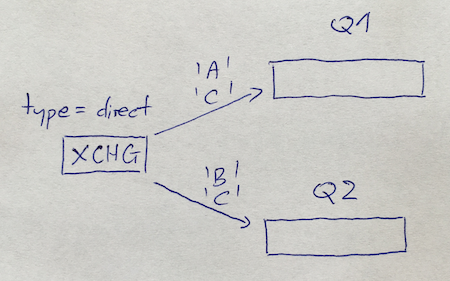
123456789101112131415161718192021222324252627282930313233343536#!/home/ubd/anaconda3/envs/test_env/bin/pythonimport jsonimport pikaimport sysif len(sys.argv) != 3:print("Call syntax: python SCRIPT_NAME CONSUMER_NAME QUEUE_NAME")exit()consumerName = sys.argv[1]queueName = sys.argv[2]def callback(channel, method, properties, body):print("Consumer %s" % (consumerName))print("Channel %r" % channel)print("Method %r" % method)print("Properties %r" % properties)print("Body %r" % body)data = json.loads(body)for key in data:print ("key=%s value=%s" % (key, data[key]))connection = pika.BlockingConnection(pika.ConnectionParameters(host='localhost'))channel = connection.channel()print("Consumer: %s" % (consumerName))print("Waiting for messages. To exit press CTRL+C")channel.basic_consume(queue=queueName,on_message_callback=callback,auto_ack=True)channel.start_consuming() - We will make a following queues setup
- Run
queue.pyscript
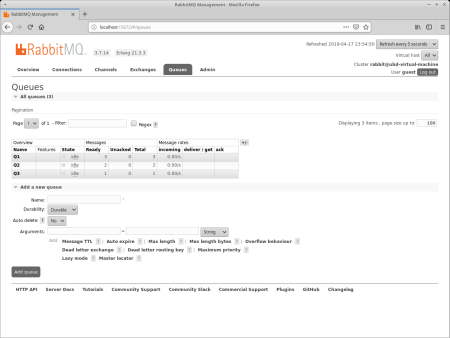
123(test_env) ubd@ubd-virtual-machine:~/Pulpit/code/rabbitmq/exchange_direct$ python queue.py Q1 A CQueue: Q1 with routingKey: AQueue: Q1 with routingKey: C
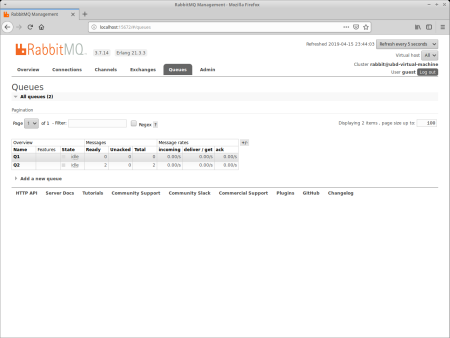
and verify results in web console

- Run again
queue.pyscript but with different parameters
123(test_env) ubd@ubd-virtual-machine:~/Pulpit/code/rabbitmq/exchange_direct$ python queue.py Q2 B CQueue: Q2 with routingKey: BQueue: Q2 with routingKey: C
- Run
- Use
producer.pyscript to add messages to theQ1andQ2queue. Saying the truth, producer has no idea to which, if any, queue messages are delivered, and probably doesn't care about it.routing_keyis the only criteria. This is an exchange responsibility to pass all messages to a correct queues.
123456(test_env) ubd@ubd-virtual-machine:~/Pulpit/code/rabbitmq/exchange_direct$ python producer.py P1 A "Text from P1 routed by A"Producer name: P1, routing key: A, message text:{"producerName": "P1", "routingKey": "A", "messageText": "Text from P1 routed by A"}(test_env) ubd@ubd-virtual-machine:~/Pulpit/code/rabbitmq/exchange_direct$ python producer.py P1 B "Text from P1 routed by B"Producer name: P1, routing key: B, message text:{"producerName": "P1", "routingKey": "B", "messageText": "Text from P1 routed by B"}(test_env) ubd@ubd-virtual-machine:~/Pulpit/code/rabbitmq/exchange_direct$ python producer.py P1 C "Text from P1 routed by C"Producer name: P1, routing key: C, message text:{"producerName": "P1", "routingKey": "C", "messageText": "Text from P1 routed by C"}
- Run consumer (
consumer.py) script to consume messages fromQ1queue
12345678910111213141516171819(test_env) ubd@ubd-virtual-machine:~/Pulpit/code/rabbitmq/exchange_direct$ python consumer.py C1 Q1Consumer: C1Waiting for messages. To exit press CTRL+CConsumer C1Channel <BlockingChannel impl=<Channel number=1 OPEN conn=<SelectConnection OPEN transport=<pika.adapters.utils.io_services_utils._AsyncPlaintextTransport object at 0x7f57c4cfbe80> params=<ConnectionParameters host=localhost port=5672 virtual_host=/ ssl=False>>>>Method <Basic.Deliver(['consumer_tag=ctag1.836df305c0674896bd1acb73d7adfe59', 'delivery_tag=1', 'exchange=exchange_direct', 'redelivered=False', 'routing_key=A'])>Properties <BasicProperties(['delivery_mode=2'])>Body b'{"producerName": "P1", "routingKey": "A", "messageText": "Text from P1 routed by A"}'key=producerName value=P1key=routingKey value=Akey=messageText value=Text from P1 routed by AConsumer C1Channel <BlockingChannel impl=<Channel number=1 OPEN conn=<SelectConnection OPEN transport=<pika.adapters.utils.io_services_utils._AsyncPlaintextTransport object at 0x7f57c4cfbe80> params=<ConnectionParameters host=localhost port=5672 virtual_host=/ ssl=False>>>>Method <Basic.Deliver(['consumer_tag=ctag1.836df305c0674896bd1acb73d7adfe59', 'delivery_tag=2', 'exchange=exchange_direct', 'redelivered=False', 'routing_key=C'])>Properties <BasicProperties(['delivery_mode=2'])>Body b'{"producerName": "P1", "routingKey": "C", "messageText": "Text from P1 routed by C"}'key=producerName value=P1key=routingKey value=Ckey=messageText value=Text from P1 routed by C


Implementing topic exchange is not much difficult than direct topic. Saying the truth, the source code should be only slightly modified and consumer stays untouched.
- Create the
producer.py,queue.pyandconsumer.pyfiles with the following contents
123456789101112131415161718192021222324252627282930313233343536#!/home/ubd/anaconda3/envs/test_env/bin/pythonimport jsonimport pikaimport sysif len(sys.argv) != 4:print("Call syntax: python SCRIPT_NAME PRODUCER_NAME ROUTING_KEY MESSAGE_STRING")exit()producerName = sys.argv[1]routingKey = sys.argv[2]messageText = sys.argv[3]connection = pika.BlockingConnection(pika.ConnectionParameters(host='localhost'))channel = connection.channel()channel.exchange_declare(exchange='exchange_topic', exchange_type='topic')data = {"producerName": producerName,"routingKey": routingKey,"messageText": messageText}message = json.dumps(data)channel.basic_publish(exchange='exchange_topic',routing_key=routingKey,body=message,properties=pika.BasicProperties(delivery_mode=2,))print("Producer name: %s, routing key: %s, message text:%s" % (producerName, routingKey, message))connection.close()
1234567891011121314151617181920212223242526#!/home/ubd/anaconda3/envs/test_env/bin/pythonimport pikaimport sysif len(sys.argv) < 3:print("Call syntax: python SCRIPT_NAME QUEUE_NAME ROUTING_KEYS")exit()queueName = sys.argv[1]routingKeys = sys.argv[2:]connection = pika.BlockingConnection(pika.ConnectionParameters(host='localhost'))channel = connection.channel()channel.exchange_declare(exchange='exchange_topic', exchange_type='topic')channel.queue_declare(queueName)for routingKey in routingKeys:channel.queue_bind(exchange='exchange_topic',queue=queueName,routing_key=routingKey)print("Queue: %s with routingKey: %s" % (queueName, routingKey))
123456789101112131415161718192021222324252627282930313233343536#!/home/ubd/anaconda3/envs/test_env/bin/pythonimport jsonimport pikaimport sysif len(sys.argv) != 3:print("Call syntax: python SCRIPT_NAME CONSUMER_NAME QUEUE_NAME")exit()consumerName = sys.argv[1]queueName = sys.argv[2]def callback(channel, method, properties, body):print("Consumer %s" % (consumerName))print("Channel %r" % channel)print("Method %r" % method)print("Properties %r" % properties)print("Body %r" % body)data = json.loads(body)for key in data:print ("key=%s value=%s" % (key, data[key]))connection = pika.BlockingConnection(pika.ConnectionParameters(host='localhost'))channel = connection.channel()print("Consumer: %s" % (consumerName))print("Waiting for messages. To exit press CTRL+C")channel.basic_consume(queue=queueName,on_message_callback=callback,auto_ack=True)channel.start_consuming() - We will make a following queues setup
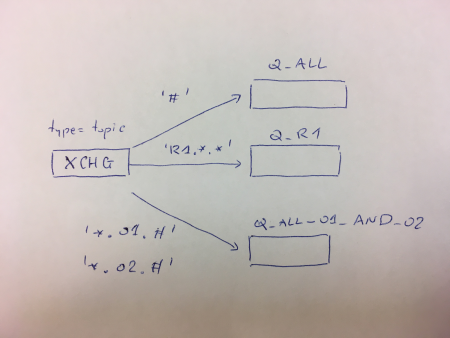
Run
queue.pyscript12(test_env) ubd@ubd-virtual-machine:~/Pulpit/code/rabbitmq/exchange_topic$ python queue.py 'Q_ALL' '#'Queue: Q_ALL with routingKey: #and verify results in web console
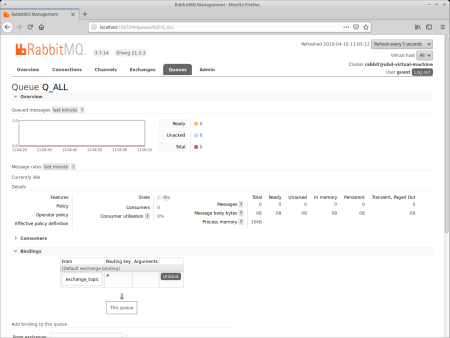
- Run
queue.pyagain and add two more queues12345(test_env) ubd@ubd-virtual-machine:~/Pulpit/code/rabbitmq/exchange_topic$ python queue.py 'Q_R1' 'R1.*.*'Queue: Q_R1 with routingKey: R1.*.*(test_env) ubd@ubd-virtual-machine:~/Pulpit/code/rabbitmq/exchange_topic$ python queue.py 'Q_ALL_O1_AND_O2' '*.O1.#' '*.O2.#'Queue: Q_ALL_O1_AND_O2 with routingKey: *.O1.#Queue: Q_ALL_O1_AND_O2 with routingKey: *.O2.# - Use
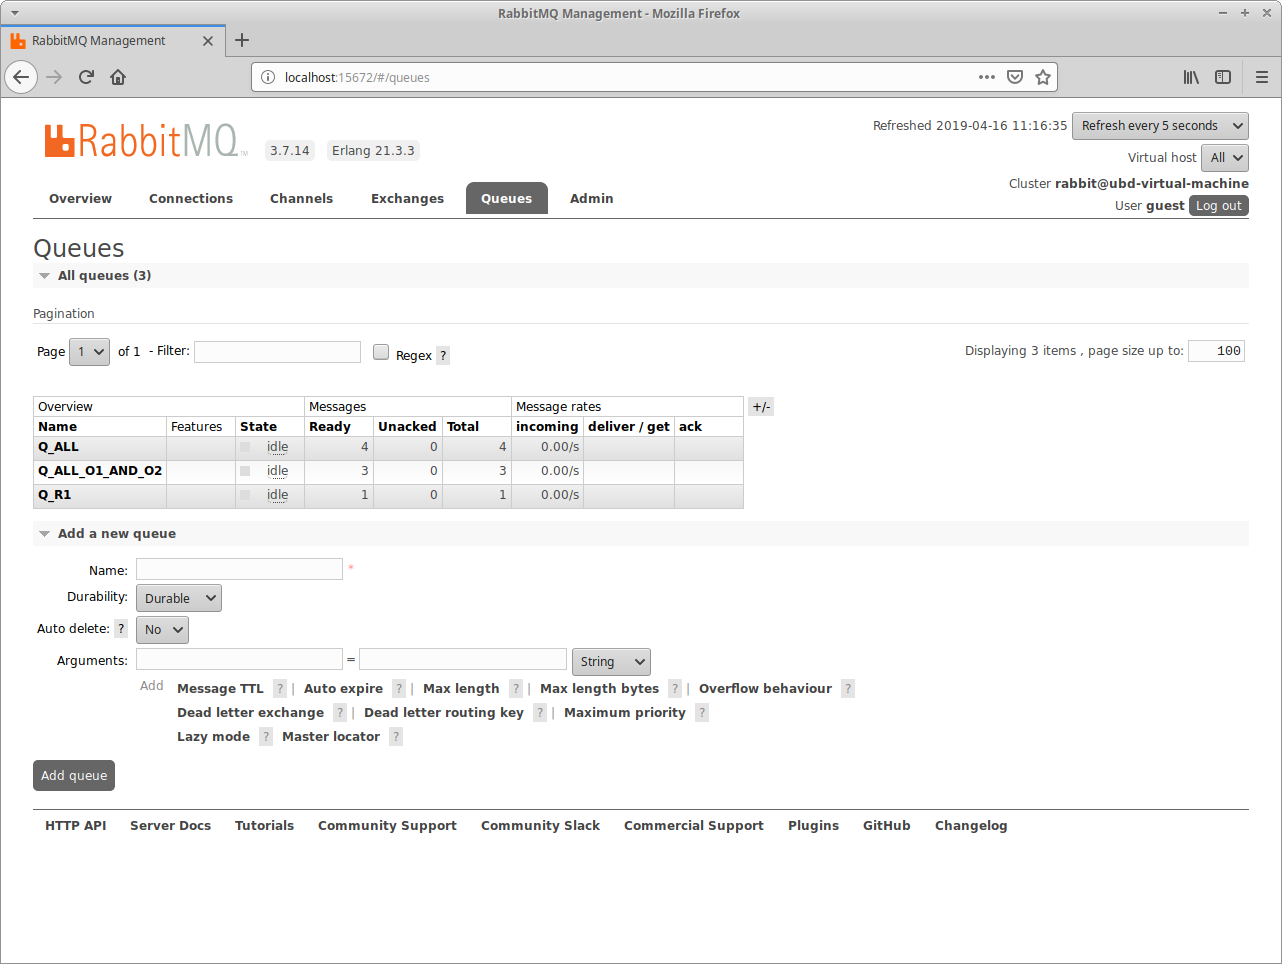
producer.pyscript to add messages to the queues.12345678(test_env) ubd@ubd-virtual-machine:~/Pulpit/code/rabbitmq/exchange_topic$ python producer.py P1 'R1.O1' 'Message 1 from P1'Producer name: P1, routing key: R1.O1, message text:{"producerName": "P1", "routingKey": "R1.O1", "messageText": "Message 1 from P1"}(test_env) ubd@ubd-virtual-machine:~/Pulpit/code/rabbitmq/exchange_topic$ python producer.py P1 'R1.O2.D1' 'Message 2 from P1'Producer name: P1, routing key: R1.O2.D1, message text:{"producerName": "P1", "routingKey": "R1.O2.D1", "messageText": "Message 2 from P1"}(test_env) ubd@ubd-virtual-machine:~/Pulpit/code/rabbitmq/exchange_topic$ python producer.py P1 'R2.O1.D1' 'Message 3 from P1'Producer name: P1, routing key: R2.O1.D1, message text:{"producerName": "P1", "routingKey": "R2.O1.D1", "messageText": "Message 3 from P1"}(test_env) ubd@ubd-virtual-machine:~/Pulpit/code/rabbitmq/exchange_topic$ python producer.py P1 'R2.O3.D1' 'Message 4 from P1'Producer name: P1, routing key: R2.O3.D1, message text:{"producerName": "P1", "routingKey": "R2.O3.D1", "messageText": "Message 4 from P1"}and verify state of queues in web console

- Run consumer (
consumer.py) script to consume messages from theQ_ALLqueue1234567891011121314151617181920212223242526272829303132333435363738(test_env) ubd@ubd-virtual-machine:~/Pulpit/code/rabbitmq/exchange_topic$ python consumer.py C1 'Q_ALL'Consumer: C1Waiting for messages. To exit press CTRL+CConsumer C1Channel <BlockingChannel impl=<Channel number=1 OPEN conn=<SelectConnection OPEN transport=<pika.adapters.utils.io_services_utils._AsyncPlaintextTransport object at 0x7ff91c1cb6a0> params=<ConnectionParameters host=localhost port=5672 virtual_host=/ ssl=False>>>>Method <Basic.Deliver(['consumer_tag=ctag1.bd65508b2b0d49e293d0f7410c2d9a83', 'delivery_tag=1', 'exchange=exchange_topic', 'redelivered=False', 'routing_key=R1.O1'])>Properties <BasicProperties(['delivery_mode=2'])>Body b'{"producerName": "P1", "routingKey": "R1.O1", "messageText": "Message 1 from P1"}'key=producerName value=P1key=routingKey value=R1.O1key=messageText value=Message 1 from P1Consumer C1Channel <BlockingChannel impl=<Channel number=1 OPEN conn=<SelectConnection OPEN transport=<pika.adapters.utils.io_services_utils._AsyncPlaintextTransport object at 0x7ff91c1cb6a0> params=<ConnectionParameters host=localhost port=5672 virtual_host=/ ssl=False>>>>Method <Basic.Deliver(['consumer_tag=ctag1.bd65508b2b0d49e293d0f7410c2d9a83', 'delivery_tag=2', 'exchange=exchange_topic', 'redelivered=False', 'routing_key=R1.O2.D1'])>Properties <BasicProperties(['delivery_mode=2'])>Body b'{"producerName": "P1", "routingKey": "R1.O2.D1", "messageText": "Message 2 from P1"}'key=producerName value=P1key=routingKey value=R1.O2.D1key=messageText value=Message 2 from P1Consumer C1Channel <BlockingChannel impl=<Channel number=1 OPEN conn=<SelectConnection OPEN transport=<pika.adapters.utils.io_services_utils._AsyncPlaintextTransport object at 0x7ff91c1cb6a0> params=<ConnectionParameters host=localhost port=5672 virtual_host=/ ssl=False>>>>Method <Basic.Deliver(['consumer_tag=ctag1.bd65508b2b0d49e293d0f7410c2d9a83', 'delivery_tag=3', 'exchange=exchange_topic', 'redelivered=False', 'routing_key=R2.O1.D1'])>Properties <BasicProperties(['delivery_mode=2'])>Body b'{"producerName": "P1", "routingKey": "R2.O1.D1", "messageText": "Message 3 from P1"}'key=producerName value=P1key=routingKey value=R2.O1.D1key=messageText value=Message 3 from P1Consumer C1Channel <BlockingChannel impl=<Channel number=1 OPEN conn=<SelectConnection OPEN transport=<pika.adapters.utils.io_services_utils._AsyncPlaintextTransport object at 0x7ff91c1cb6a0> params=<ConnectionParameters host=localhost port=5672 virtual_host=/ ssl=False>>>>Method <Basic.Deliver(['consumer_tag=ctag1.bd65508b2b0d49e293d0f7410c2d9a83', 'delivery_tag=4', 'exchange=exchange_topic', 'redelivered=False', 'routing_key=R2.O3.D1'])>Properties <BasicProperties(['delivery_mode=2'])>Body b'{"producerName": "P1", "routingKey": "R2.O3.D1", "messageText": "Message 4 from P1"}'key=producerName value=P1key=routingKey value=R2.O3.D1key=messageText value=Message 4 from P1^C[...]KeyboardInterrupt - Run consumer (
consumer.py) script to consume messages from theQ_R1queue1234567891011121314(test_env) ubd@ubd-virtual-machine:~/Pulpit/code/rabbitmq/exchange_topic$ python consumer.py C2 'Q_R1'Consumer: C2Waiting for messages. To exit press CTRL+CConsumer C2Channel <BlockingChannel impl=<Channel number=1 OPEN conn=<SelectConnection OPEN transport=<pika.adapters.utils.io_services_utils._AsyncPlaintextTransport object at 0x7fc378f75e10> params=<ConnectionParameters host=localhost port=5672 virtual_host=/ ssl=False>>>>Method <Basic.Deliver(['consumer_tag=ctag1.293d03a76d674978af75d69bc1075616', 'delivery_tag=1', 'exchange=exchange_topic', 'redelivered=False', 'routing_key=R1.O2.D1'])>Properties <BasicProperties(['delivery_mode=2'])>Body b'{"producerName": "P1", "routingKey": "R1.O2.D1", "messageText": "Message 2 from P1"}'key=producerName value=P1key=routingKey value=R1.O2.D1key=messageText value=Message 2 from P1^C[...]KeyboardInterrupt - Run consumer (
consumer.py) script to consume messages from theQ_ALL_O1_AND_O2queue123456789101112131415161718192021222324252627282930(test_env) ubd@ubd-virtual-machine:~/Pulpit/code/rabbitmq/exchange_topic$ python consumer.py C3 'Q_ALL_O1_AND_O2'Consumer: C3Waiting for messages. To exit press CTRL+CConsumer C3Channel <BlockingChannel impl=<Channel number=1 OPEN conn=<SelectConnection OPEN transport=<pika.adapters.utils.io_services_utils._AsyncPlaintextTransport object at 0x7efdc4d3c668> params=<ConnectionParameters host=localhost port=5672 virtual_host=/ ssl=False>>>>Method <Basic.Deliver(['consumer_tag=ctag1.bf48e7e7474e46be9600e4491e9df1b8', 'delivery_tag=1', 'exchange=exchange_topic', 'redelivered=False', 'routing_key=R1.O1'])>Properties <BasicProperties(['delivery_mode=2'])>Body b'{"producerName": "P1", "routingKey": "R1.O1", "messageText": "Message 1 from P1"}'key=producerName value=P1key=routingKey value=R1.O1key=messageText value=Message 1 from P1Consumer C3Channel <BlockingChannel impl=<Channel number=1 OPEN conn=<SelectConnection OPEN transport=<pika.adapters.utils.io_services_utils._AsyncPlaintextTransport object at 0x7efdc4d3c668> params=<ConnectionParameters host=localhost port=5672 virtual_host=/ ssl=False>>>>Method <Basic.Deliver(['consumer_tag=ctag1.bf48e7e7474e46be9600e4491e9df1b8', 'delivery_tag=2', 'exchange=exchange_topic', 'redelivered=False', 'routing_key=R1.O2.D1'])>Properties <BasicProperties(['delivery_mode=2'])>Body b'{"producerName": "P1", "routingKey": "R1.O2.D1", "messageText": "Message 2 from P1"}'key=producerName value=P1key=routingKey value=R1.O2.D1key=messageText value=Message 2 from P1Consumer C3Channel <BlockingChannel impl=<Channel number=1 OPEN conn=<SelectConnection OPEN transport=<pika.adapters.utils.io_services_utils._AsyncPlaintextTransport object at 0x7efdc4d3c668> params=<ConnectionParameters host=localhost port=5672 virtual_host=/ ssl=False>>>>Method <Basic.Deliver(['consumer_tag=ctag1.bf48e7e7474e46be9600e4491e9df1b8', 'delivery_tag=3', 'exchange=exchange_topic', 'redelivered=False', 'routing_key=R2.O1.D1'])>Properties <BasicProperties(['delivery_mode=2'])>Body b'{"producerName": "P1", "routingKey": "R2.O1.D1", "messageText": "Message 3 from P1"}'key=producerName value=P1key=routingKey value=R2.O1.D1key=messageText value=Message 3 from P1^C[...]KeyboardInterrupt


Implementing headers exchange is not much difficult than topic exchange. Again consumer stays untouched.
- Create the
producer.py,queue.pyandconsumer.pyfiles with the following contents
123456789101112131415161718192021222324252627282930313233343536373839404142434445#!/home/ubd/anaconda3/envs/test_env/bin/pythonimport jsonimport pikaimport sysif len(sys.argv) < 4:print("Call syntax: python SCRIPT_NAME PRODUCER_NAME MESSAGE_STRING HEADERS_VALUES")exit()producerName = sys.argv[1]messageText = sys.argv[2]headersValues = sys.argv[3:]connection = pika.BlockingConnection(pika.ConnectionParameters(host='localhost'))channel = connection.channel()channel.exchange_declare(exchange='exchange_headers', exchange_type='headers')headers = {}number = 1for headerValue in headersValues:headers["K" + str(number)] = headerValuenumber = number + 1data = {"producerName": producerName,"headersValues": headersValues,"headers": headers,"messageText": messageText}message = json.dumps(data)channel.basic_publish(exchange='exchange_headers',routing_key='',body=message,properties=pika.BasicProperties(delivery_mode=2,headers=headers))print("Producer name: %s, headers: %s, message text:%s" % (producerName, headers, message))connection.close()
Notice that althoug we don't use routing key for headers exchange it is required bybasic_publishmethod
1TypeError: basic_publish() missing 1 required positional argument: 'routing_key'
so we simply use an empty string for this.
123456789101112131415161718192021222324252627282930313233#!/home/ubd/anaconda3/envs/test_env/bin/pythonimport pikaimport sysif len(sys.argv) < 4:print("Call syntax: python SCRIPT_NAME QUEUE_NAME 'all'|'any' HEADERS_VALUES")exit()queueName = sys.argv[1]match = sys.argv[2]headersValues = sys.argv[3:]connection = pika.BlockingConnection(pika.ConnectionParameters(host='localhost'))channel = connection.channel()channel.exchange_declare(exchange='exchange_headers', exchange_type='headers')channel.queue_declare(queueName)headers = {}headers["x-match"] = matchnumber = 1for headerValue in headersValues:headers["K" + str(number)] = headerValuenumber = number + 1channel.queue_bind(exchange='exchange_headers',queue=queueName,arguments=headers)print("Queue: %s with headers: %s" % (queueName, headers))
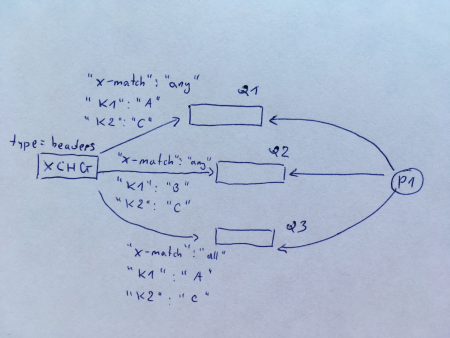
123456789101112131415161718192021222324252627282930313233343536#!/home/ubd/anaconda3/envs/test_env/bin/pythonimport jsonimport pikaimport sysif len(sys.argv) != 3:print("Call syntax: python SCRIPT_NAME CONSUMER_NAME QUEUE_NAME")exit()consumerName = sys.argv[1]queueName = sys.argv[2]def callback(channel, method, properties, body):print("Consumer %s" % (consumerName))print("Channel %r" % channel)print("Method %r" % method)print("Properties %r" % properties)print("Body %r" % body)data = json.loads(body)for key in data:print ("key=%s value=%s" % (key, data[key]))connection = pika.BlockingConnection(pika.ConnectionParameters(host='localhost'))channel = connection.channel()print("Consumer: %s" % (consumerName))print("Waiting for messages. To exit press CTRL+C")channel.basic_consume(queue=queueName,on_message_callback=callback,auto_ack=True)channel.start_consuming() - We will make a following queues setup
Run
queue.pyscript
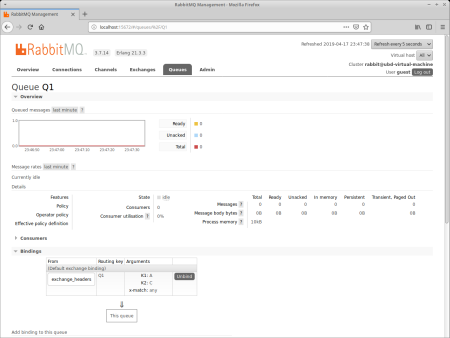
12(test_env) ubd@ubd-virtual-machine:~/Pulpit/code/rabbitmq/exchange_headers$ python queue.py Q1 'any' A CQueue: Q1 with headers: {'x-match': 'any', 'K1': 'A', 'K2': 'C'}
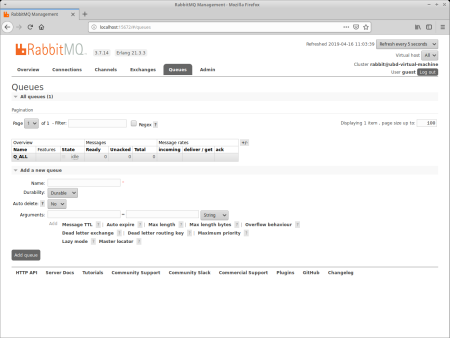
and verify results in web console
- Run
queue.pyagain and add two more queues
1234(test_env) ubd@ubd-virtual-machine:~/Pulpit/code/rabbitmq/exchange_headers$ python queue.py Q2 'any' B CQueue: Q2 with headers: {'x-match': 'any', 'K1': 'B', 'K2': 'C'}(test_env) ubd@ubd-virtual-machine:~/Pulpit/code/rabbitmq/exchange_headers$ python queue.py Q3 'all' A CQueue: Q3 with headers: {'x-match': 'all', 'K1': 'A', 'K2': 'C'} - Use
producer.pyscript to add messages to the queues.
12345678(test_env) ubd@ubd-virtual-machine:~/Pulpit/code/rabbitmq/exchange_headers$ python producer.py P1 'Message 1 from producer P1' AProducer name: P1, headers: {'K1': 'A'}, message text:{"producerName": "P1", "headersValues": ["A"], "headers": {"K1": "A"}, "messageText": "Message 1 from producer P1"}(test_env) ubd@ubd-virtual-machine:~/Pulpit/code/rabbitmq/exchange_headers$ python producer.py P1 'Message 2 from producer P1' CProducer name: P1, headers: {'K1': 'C'}, message text:{"producerName": "P1", "headersValues": ["C"], "headers": {"K1": "C"}, "messageText": "Message 2 from producer P1"}(test_env) ubd@ubd-virtual-machine:~/Pulpit/code/rabbitmq/exchange_headers$ python producer.py P1 'Message 3 from producer P1' D CProducer name: P1, headers: {'K1': 'D', 'K2': 'C'}, message text:{"producerName": "P1", "headersValues": ["D", "C"], "headers": {"K1": "D", "K2": "C"}, "messageText": "Message 3 from producer P1"}(test_env) ubd@ubd-virtual-machine:~/Pulpit/code/rabbitmq/exchange_headers$ python producer.py P1 'Message 4 from producer P1' A CProducer name: P1, headers: {'K1': 'A', 'K2': 'C'}, message text:{"producerName": "P1", "headersValues": ["A", "C"], "headers": {"K1": "A", "K2": "C"}, "messageText": "Message 4 from producer P1"}
and verify state of queues in web console
- Run consumer (
consumer.py) script to consume messages from theQ1queue
123456789101112131415161718192021222324252627282930313233(test_env) ubd@ubd-virtual-machine:~/Pulpit/code/rabbitmq/exchange_headers$ python consumer.py C1 Q1Consumer: C1Waiting for messages. To exit press CTRL+CConsumer C1Channel <BlockingChannel impl=<Channel number=1 OPEN conn=<SelectConnection OPEN transport=<pika.adapters.utils.io_services_utils._AsyncPlaintextTransport object at 0x7f999f58de80> params=<ConnectionParameters host=localhost port=5672 virtual_host=/ ssl=False>>>>Method <Basic.Deliver(['consumer_tag=ctag1.256c10d307d444f9a59a6ff5c41971cc', 'delivery_tag=1', 'exchange=exchange_headers', 'redelivered=False', 'routing_key='])>Properties <BasicProperties(['delivery_mode=2', "headers={'K1': 'A'}"])>Body b'{"producerName": "P1", "headersValues": ["A"], "headers": {"K1": "A"}, "messageText": "Message 1 from producer P1"}'key=producerName value=P1key=headersValues value=['A']key=headers value={'K1': 'A'}key=messageText value=Message 1 from producer P1Consumer C1Channel <BlockingChannel impl=<Channel number=1 OPEN conn=<SelectConnection OPEN transport=<pika.adapters.utils.io_services_utils._AsyncPlaintextTransport object at 0x7f999f58de80> params=<ConnectionParameters host=localhost port=5672 virtual_host=/ ssl=False>>>>Method <Basic.Deliver(['consumer_tag=ctag1.256c10d307d444f9a59a6ff5c41971cc', 'delivery_tag=2', 'exchange=exchange_headers', 'redelivered=False', 'routing_key='])>Properties <BasicProperties(['delivery_mode=2', "headers={'K1': 'D', 'K2': 'C'}"])>Body b'{"producerName": "P1", "headersValues": ["D", "C"], "headers": {"K1": "D", "K2": "C"}, "messageText": "Message 3 from producer P1"}'key=producerName value=P1key=headersValues value=['D', 'C']key=headers value={'K1': 'D', 'K2': 'C'}key=messageText value=Message 3 from producer P1Consumer C1Channel <BlockingChannel impl=<Channel number=1 OPEN conn=<SelectConnection OPEN transport=<pika.adapters.utils.io_services_utils._AsyncPlaintextTransport object at 0x7f999f58de80> params=<ConnectionParameters host=localhost port=5672 virtual_host=/ ssl=False>>>>Method <Basic.Deliver(['consumer_tag=ctag1.256c10d307d444f9a59a6ff5c41971cc', 'delivery_tag=3', 'exchange=exchange_headers', 'redelivered=False', 'routing_key='])>Properties <BasicProperties(['delivery_mode=2', "headers={'K1': 'A', 'K2': 'C'}"])>Body b'{"producerName": "P1", "headersValues": ["A", "C"], "headers": {"K1": "A", "K2": "C"}, "messageText": "Message 4 from producer P1"}'key=producerName value=P1key=headersValues value=['A', 'C']key=headers value={'K1': 'A', 'K2': 'C'}key=messageText value=Message 4 from producer P1^C[...]KeyboardInterrupt - Run consumer (
consumer.py) script to consume messages from theQ2queue
123456789101112131415161718192021222324(test_env) ubd@ubd-virtual-machine:~/Pulpit/code/rabbitmq/exchange_headers$ python consumer.py C1 Q2Consumer: C1Waiting for messages. To exit press CTRL+CConsumer C1Channel <BlockingChannel impl=<Channel number=1 OPEN conn=<SelectConnection OPEN transport=<pika.adapters.utils.io_services_utils._AsyncPlaintextTransport object at 0x7f12ecb22588> params=<ConnectionParameters host=localhost port=5672 virtual_host=/ ssl=False>>>>Method <Basic.Deliver(['consumer_tag=ctag1.610397a8dbbf42e28f5688350f14a6ff', 'delivery_tag=1', 'exchange=exchange_headers', 'redelivered=False', 'routing_key='])>Properties <BasicProperties(['delivery_mode=2', "headers={'K1': 'D', 'K2': 'C'}"])>Body b'{"producerName": "P1", "headersValues": ["D", "C"], "headers": {"K1": "D", "K2": "C"}, "messageText": "Message 3 from producer P1"}'key=producerName value=P1key=headersValues value=['D', 'C']key=headers value={'K1': 'D', 'K2': 'C'}key=messageText value=Message 3 from producer P1Consumer C1Channel <BlockingChannel impl=<Channel number=1 OPEN conn=<SelectConnection OPEN transport=<pika.adapters.utils.io_services_utils._AsyncPlaintextTransport object at 0x7f12ecb22588> params=<ConnectionParameters host=localhost port=5672 virtual_host=/ ssl=False>>>>Method <Basic.Deliver(['consumer_tag=ctag1.610397a8dbbf42e28f5688350f14a6ff', 'delivery_tag=2', 'exchange=exchange_headers', 'redelivered=False', 'routing_key='])>Properties <BasicProperties(['delivery_mode=2', "headers={'K1': 'A', 'K2': 'C'}"])>Body b'{"producerName": "P1", "headersValues": ["A", "C"], "headers": {"K1": "A", "K2": "C"}, "messageText": "Message 4 from producer P1"}'key=producerName value=P1key=headersValues value=['A', 'C']key=headers value={'K1': 'A', 'K2': 'C'}key=messageText value=Message 4 from producer P1^C[...]KeyboardInterrupt - Run consumer (
consumer.py) script to consume messages from theQ3queue
123456789101112131415(test_env) ubd@ubd-virtual-machine:~/Pulpit/code/rabbitmq/exchange_headers$ python consumer.py C1 Q3Consumer: C1Waiting for messages. To exit press CTRL+CConsumer C1Channel <BlockingChannel impl=<Channel number=1 OPEN conn=<SelectConnection OPEN transport=<pika.adapters.utils.io_services_utils._AsyncPlaintextTransport object at 0x7f29e1b28e80> params=<ConnectionParameters host=localhost port=5672 virtual_host=/ ssl=False>>>>Method <Basic.Deliver(['consumer_tag=ctag1.5d872dd278384b1ea50997233da73ce8', 'delivery_tag=1', 'exchange=exchange_headers', 'redelivered=False', 'routing_key='])>Properties <BasicProperties(['delivery_mode=2', "headers={'K1': 'A', 'K2': 'C'}"])>Body b'{"producerName": "P1", "headersValues": ["A", "C"], "headers": {"K1": "A", "K2": "C"}, "messageText": "Message 4 from producer P1"}'key=producerName value=P1key=headersValues value=['A', 'C']key=headers value={'K1': 'A', 'K2': 'C'}key=messageText value=Message 4 from producer P1^C[...]KeyboardInterrupt


