
In this tutorial you will learn how to create simple web application with Python and Flask framework.
- Create project
- Create initial Flask application
- Templating
- Setting up the database
- Getting all data
- Getting single data
- Adding data
- Updating data
In this project you will use PyCharm (in Community Edition)
|
PyCharm simplifies coding, but if you want, you can make this project without it and do some actions manualy from command line.
After launching PyCharm select New Project on Welcome screen:

|
and on the next screen select location to save it (in my case: /home/nosql/Pulpit/flask_basic_app)

|
and press Create to confirm your choice.
If you got this error while PyCharm creates your project:

|
please try this command:
|
1 |
sudo apt-get install python3-distutils |
and then restart PyCharm. After that I was able to create my project and run basic application:

|

|

|
Add the following code to
main.py file:
|
1 2 3 4 5 6 7 8 |
from flask import Flask app = Flask(__name__) @app.route('/') def hello(): return '<h1>Hello, World!</h1>' |
At this moment you will get an information, that some packages are missing so you should import all required package(s) - in this case only Flask:
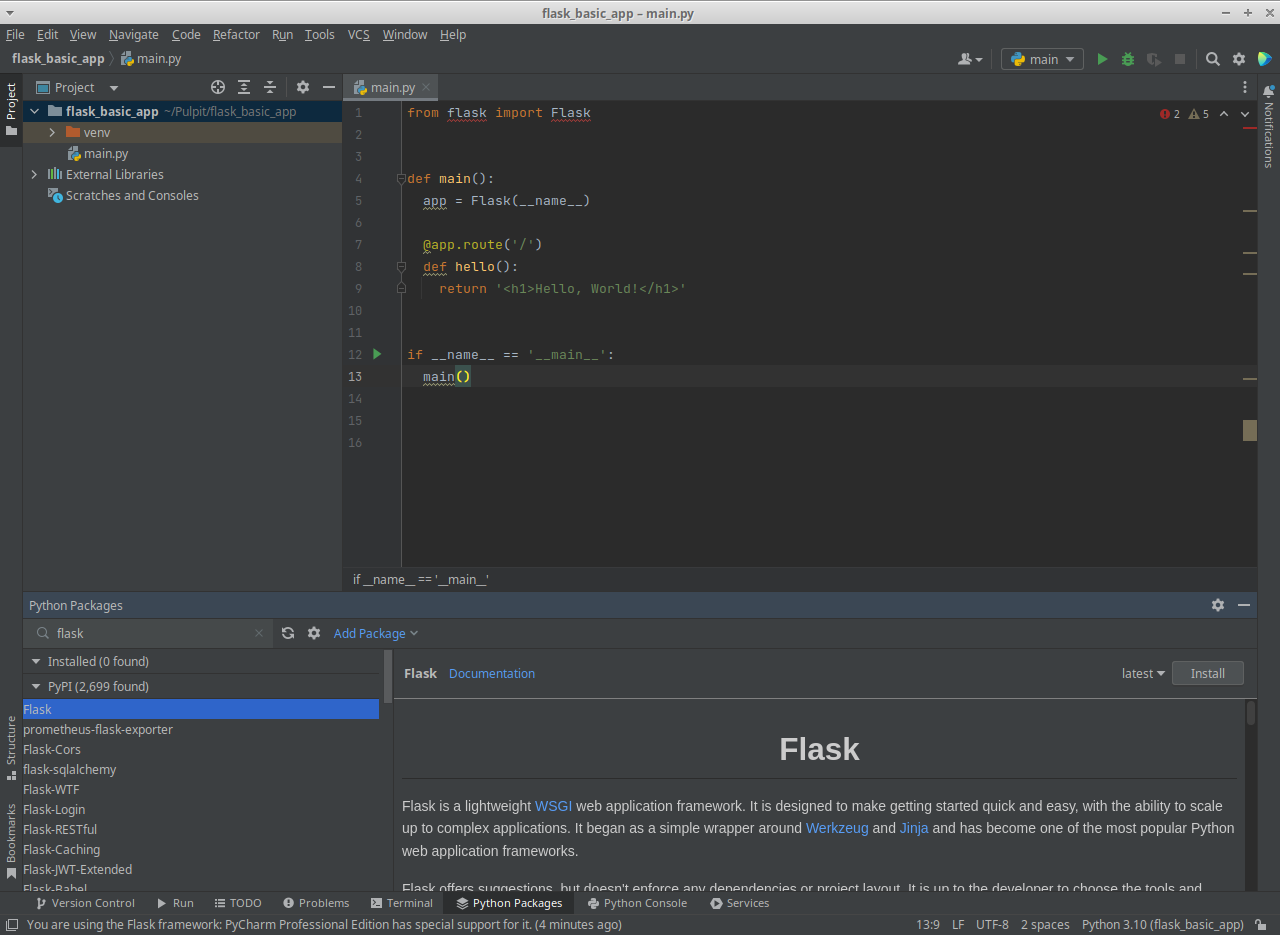
|

|
When done, open terminal and activate your virtual environment:
|
1 2 |
nosql@nosql:~/Pulpit$ source flask_basic_app/venv/bin/activate (venv) nosql@nosql:~/Pulpit$ |
Next set environment variables required by Flask:
|
1 2 3 4 5 |
(venv) nosql@nosql:~/Pulpit$ cd flask_basic_app/ (venv) nosql@nosql:~/Pulpit/flask_basic_app$ export FLASK_APP=main (venv) nosql@nosql:~/Pulpit/flask_basic_app$ export FLASK_DEBUG=1 (venv) nosql@nosql:~/Pulpit/flask_basic_app$ echo $FLASK_DEBUG 1 |
Now you can run your application:
|
1 2 3 4 5 6 7 8 9 |
(venv) nosql@nosql:~/Pulpit/flask_basic_app$ flask run * Serving Flask app 'main' * Debug mode: on WARNING: This is a development server. Do not use it in a production deployment. Use a production WSGI server instead. * Running on http://127.0.0.1:5000 Press CTRL+C to quit * Restarting with stat * Debugger is active! * Debugger PIN: 391-165-440 |
To verify if it realy runs, open a browser and type in the URL http://127.0.0.1:5000/ - you will see web page with Hello, World! printed on it; this confirms that your application is successfully running.

|
Flask uses a simple web server to serve our application in a development environment, which also means that the Flask debugger is running to make catching errors easier. This development server should not be used in a production deployment. While a Flask application’s development server is already running, it is not possible to run another Flask application with the same
flask run command. This is because flask run uses the port number 5000 by default, and once it is taken, it becomes unavailable to run another application. To solve this problem, you have to either stop the server that is currently running pressing CTRL+C and then run flask run again, or if you want to run both applications at the same time, you can pass a different port number to the -p argument, for example, to run another application on port 5001 use the command: flask run -p 5001.You can create initial Flask project directly from PyCharm. See the following links for details:
At this moment your application displays a simple message without any HTML. Using HTML is cool but Flask gives you something much more powerful: the Jinja template engine. This will make managing all your HTML much easier by writing pure HTML code in
.htm files as well as enrich it with some logic.
Edit main.py file and put there the following code:
|
1 2 3 4 5 6 7 8 |
from flask import Flask, render_template app = Flask(__name__) @app.route('/') def index(): return render_template('index.html') |
The index() view function returns the result of calling render_template() with index.htm as an argument. By default index.htm file should be located in the templates folder.
So, create a directory called templates inside your flask_basic_app directory:

|
Then inside it, create a file called index.htm:

|
and put there the following code:
|
1 2 3 4 5 6 7 8 9 10 |
<!DOCTYPE html> <html lang="en"> <head> <meta charset="UTF-8"> <title>BugNote</title> </head> <body> <h1>BugNote</h1> </body> </html> |
In most cases web frameworks, besides directory dedicated to keep templates, use other directory for hosting static files, such as CSS files, JavaScript files, and images the application uses. It is no different in the case of Flask. Create a directory called static inside your main flask_basic_app directory and inside create another directory called css to host .css style files.
Inside css directory create style.css file and put there the following CSS rule:
|
1 2 3 4 5 6 |
h1 { border: 2px #eee solid; color: brown; text-align: center; padding: 10px; } |
Add a link to the style.css file inside the section of the index.htm template file:
|
1 2 3 4 5 6 7 |
[...] <head> <meta charset="UTF-8"> <link rel="stylesheet" href="{{ url_for('static', filename= 'css/style.css') }}"> <title>BugNote</title> </head> [...] |
Upon refreshing the main page of your application, you will notice that the text is now in brown, centered, and enclosed inside a border:
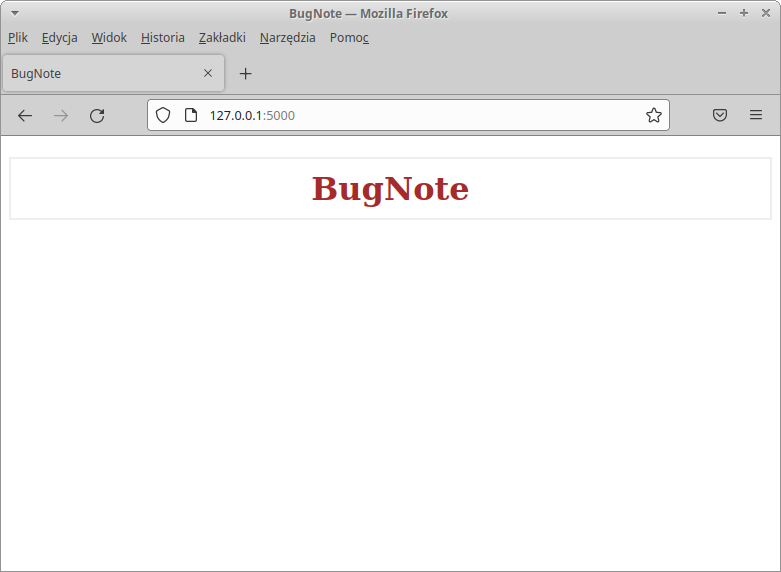
|
It's not surprisng that making another HTML file you will repeat most of the HTML code you already wrote in the index.htm template. You can avoid unproductive code repetition with the help of a base template file, which all of your HTML files will inherit from.
You can use the CSS language to style the application and make it more appealing using your own design. However, if you’re not a web designer, or if you aren’t familiar with CSS, then you can use the Bootstrap toolkit, which provides easy-to-use components for styling your application. In this project, we’ll use Bootstrap.
To make a base template, first create a file called base.htm inside your templates directory. Next paste into it an inital Bootstrap webpag code (see Get started with Bootstrap); using Bootstrap will make your app to look nice and allow you to save a lot of time needed to style the application and make it more appealing using your own design using pure CSS language:
|
1 2 3 4 5 6 7 8 9 10 11 12 13 |
<!doctype html> <html lang="en"> <head> <meta charset="utf-8"> <meta name="viewport" content="width=device-width, initial-scale=1"> <title>Bootstrap demo</title> <link href="https://cdn.jsdelivr.net/npm/bootstrap@5.2.2/dist/css/bootstrap.min.css" rel="stylesheet" integrity="sha384-Zenh87qX5JnK2Jl0vWa8Ck2rdkQ2Bzep5IDxbcnCeuOxjzrPF/et3URy9Bv1WTRi" crossorigin="anonymous"> </head> <body> <h1>Hello, world!</h1> <script src="https://cdn.jsdelivr.net/npm/bootstrap@5.2.2/dist/js/bootstrap.bundle.min.js" integrity="sha384-OERcA2EqjJCMA+/3y+gxIOqMEjwtxJY7qPCqsdltbNJuaOe923+mo//f6V8Qbsw3" crossorigin="anonymous"></script> </body> </html> |
When opened in web browser you will see:

|
Now change default Bootstrap template to the following form:
|
1 2 3 4 5 6 7 8 9 10 11 12 13 14 15 16 17 18 19 20 21 22 23 24 25 26 27 28 29 30 31 |
<!doctype html> <html lang="en"> <head> <meta charset="utf-8"> <meta name="viewport" content="width=device-width, initial-scale=1"> <!-- Bootstrap CSS --> <link href="https://cdn.jsdelivr.net/npm/bootstrap@5.2.2/dist/css/bootstrap.min.css" rel="stylesheet" integrity="sha384-Zenh87qX5JnK2Jl0vWa8Ck2rdkQ2Bzep5IDxbcnCeuOxjzrPF/et3URy9Bv1WTRi" crossorigin="anonymous"> <title>{% block title %} {% endblock %}</title> </head> <body> <nav class="navbar navbar-expand-md navbar-light bg-light"> <a class="navbar-brand" href="{{ url_for('index')}}">BugNote</a> <button class="navbar-toggler" type="button" data-toggle="collapse" data-target="#navbarNav" aria-controls="navbarNav" aria-expanded="false" aria-label="Toggle navigation"> <span class="navbar-toggler-icon"></span> </button> <div class="collapse navbar-collapse" id="navbarNav"> <ul class="navbar-nav"> <li class="nav-item"> <a class="nav-link" href="#">About</a> </li> </ul> </div> </nav> <div class="container"> {% block content %} {% endblock %} </div> <!-- Optional JavaScript --> <!-- Bootstrap JS first --> <script src="https://cdn.jsdelivr.net/npm/bootstrap@5.2.2/dist/js/bootstrap.bundle.min.js" integrity="sha384-OERcA2EqjJCMA+/3y+gxIOqMEjwtxJY7qPCqsdltbNJuaOe923+mo//f6V8Qbsw3" crossorigin="anonymous"></script> </body> </html> |
Although this code shouldn't be a problem for you, I will comment some elements so you will have better understanding of what you are doing:
-
is block that serves as a placeholder where you can put various contents according to your needs; in this case you will put here a title for each page in your application.1{% block title %} {% endblock %}
{{ url_for('index')}}is a call to a function that will return the URL for the required view function (index()in this case).{% block content %} {% endblock %}is another block that will be replaced by main content of the page.
Now you have a base template (base.htm file) and you can take advantage of it using template inheritance - the ability to create new HTML files as an extended or "rebuilded" forms of "base" file. To do so, open the index.htm file and replace its contents with the following:
|
1 2 3 4 5 |
{% extends 'base.htm' %} {% block content %} <h1>{% block title %} BugNote {% endblock %}</h1> {% endblock %} |
In this new version of the index.htm template, you use the {% extends %} tag to inherit from the base.htm template and extend it via replacing the content block in the base template with what is provided inside the content block in extension file.
Save and close the file and refresh the index page on your browser. You’ll see your page with a navigation bar and styled title:
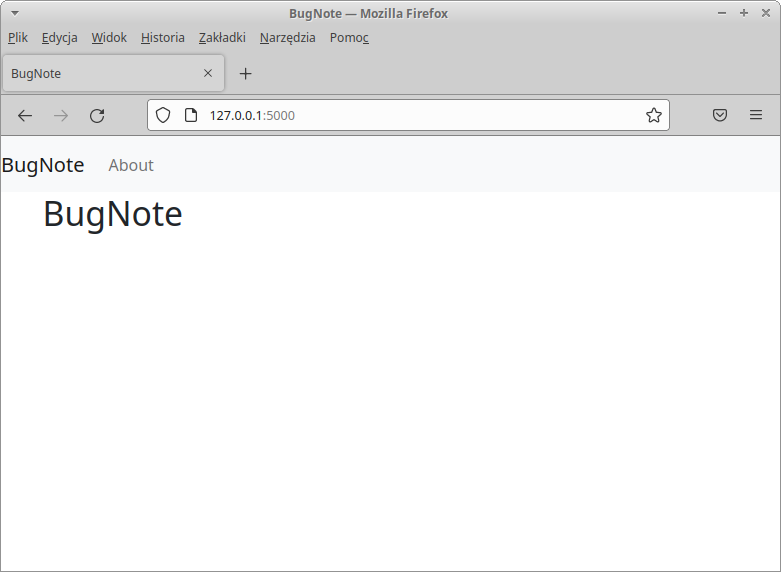
|
Now, you’ll set up a database to store your data. To make things simpler you’ll use a SQLite database to store your data. The
sqlite3 module, which you will use to interact with the database, is readily available in the standard Python library.
First you need to create a table called bugs with the necessary columns. The simplest way is to create an .sql file that contains all SQL commands required to create table(s) with sample data and then use it to create the database.
Open a file called db.sql inside your flask_basic_app directory and put there the following code:
|
1 2 3 4 5 6 7 8 9 |
DROP TABLE IF EXISTS bugs; CREATE TABLE bugs ( id INTEGER PRIMARY KEY AUTOINCREMENT, created TIMESTAMP NOT NULL DEFAULT CURRENT_TIMESTAMP, title TEXT NOT NULL, type TEXT NOT NULL, description TEXT NOT NULL ); |
You can use this SQL file to create the database "manually" (for example with command line call) or use it in Python script where you will also add some data. In this case all data insertion statements will be hardcoded, but you can modify the code to read data to be inserted for axample from a CSV file.
Create a file named create_db.py inside the flask_basic_app directory and add there a following code:
|
1 2 3 4 5 6 7 8 9 10 11 12 13 14 15 16 17 18 19 20 21 22 23 24 |
import sqlite3 connection = sqlite3.connect('bugs.db') with open('db.sql') as f: connection.executescript(f.read()) cur = connection.cursor() cur.execute("INSERT INTO bugs (type, title, description) VALUES (?, ?, ?)", ('add (high priority)', 'Add example', 'Add more examples in section 3.2.') ) cur.execute("INSERT INTO bugs (type, title, description) VALUES (?, ?, ?)", ('change (minor)', 'Change title', 'Change title of section 4.1 to something much shorter.') ) connection.commit() connection.close() |
You can run create_db.py simply from command line as you do with all regular Python files, or directly from PyCharm:

|

|
As e result, a new file called bugs.db will appear in your flask_basic_app directory. This means you’ve successfully set up your database.
Open the
main.py file to make the set of modifications:
-
Import the
sqlite3module at the top of themain.pyfile:123import sqlite3from flask import Flask, render_template[...] -
In the
main.pyfile create a function that creates a database connection and return it:1234def getDBConnection():connection = sqlite3.connect('bugs.db')connection.row_factory = sqlite3.Rowreturn connectionBecause you set the
row_factoryattribute tosqlite3.Rowyou will have name-based access to columns, which means that the database connection will return rows that behave like regular Python dictionary. -
Modify the
index()function to look like the following:123456@app.route('/')def index():connection = getDBConnection()bugs = connection.execute('SELECT * FROM bugs').fetchall()connection.close()return render_template('index.htm', bugs=bugs) -
Open the
index.htmfile and change its contents to the following form:12345678910111213{% extends 'base.htm' %}{% block content %}<h1>{% block title %} BugNote {% endblock %}</h1>{% for bug in bugs %}<a href="#"><h2>{{ bug['title'] }}</h2></a><span class="badge text-bg-primary">{{ bug['type'] }}</span><span class="badge text-bg-primary">{{ bug['created'] }}</span><hr/>{% endfor %}{% endblock %}
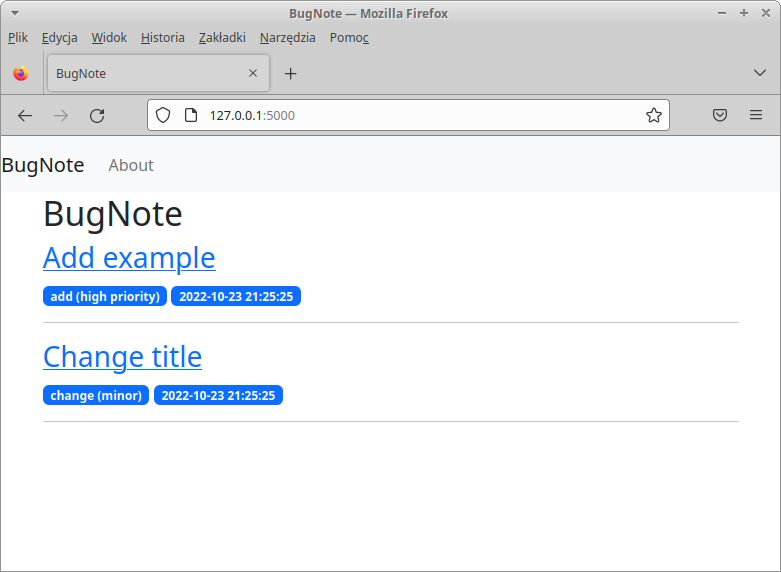
Once you are done editing all the above files, navigate to the index page in your browser. On your page you’ll see two bugs you added to the database in create_db.py file:
|
In
main.py file add the getBug() function:
|
1 2 3 4 5 6 7 8 |
def getBug(bugId): connection = getDBConnection() bug = connection.execute('SELECT * FROM bugs WHERE id = ?', (bugId,)).fetchone() connection.close() if bug is None: abort(404) return bug |
You will use this function passing it a bug ID (via bugId argument) and receive back the bug associated with the provided ID. If the bug with specified ID does not exist, you will respond with a 404 Not Found message. To make it possible, you need to import the abort() function from the Werkzeug library, which was installed along with Flask, at the top of the main.py file:
|
1 2 3 4 |
import sqlite3 from flask import Flask, render_template from werkzeug.exceptions import abort [...] |
Add the following view function to the main.py file:
|
1 2 3 4 |
@app.route('/<int:bugId>') def bugPage(bugId): bug = getBug(bugId) return render_template('bug.htm', bug=bug) |
In this view function, you add a variable rule / is a positive integer (marked with the int converter) that you need to access in this view function.
Create bug.htm template file and add there the following code:
|
1 2 3 4 5 6 7 8 |
{% extends 'base.htm' %} {% block content %} <h2>{% block title %} {{ bug['title'] }} {% endblock %}</h2> <span class="badge text-bg-primary">{{ bug['type'] }}</span> <span class="badge text-bg-primary">{{ bug['created'] }}</span> <p>{{ bug['description'] }}</p> {% endblock %} |
This code is similar to the index.htm file, except that it displays a single bug data: creation date-time, title, type and its description.
You can now navigate to the following URLs to see the two bugs you have in your database: type in web browser's URL top field http://127.0.0.1:5000/1 or http://127.0.0.1:5000/2 and you will see expected bug:

|

|
If you specify nonexisting ID, for example http://127.0.0.1:5000/123, you will see:

|
Entering ID of bug is not very convenient and comfortable - it would be much better if you will jump to right URL as a result of selecting base bug info on index page. To satisfy this now you’ll make each post title link to its respective page. You’ll do this using the url_for()index.htm template for editing and change the value of the href attribute from # to {{ url_for('bugPage', bugId=bug['id']) }}:
|
1 2 3 4 5 6 7 8 9 10 11 12 13 |
{% extends 'base.htm' %} {% block content %} <h1>{% block title %} BugNote {% endblock %}</h1> {% for bug in bugs %} <a href="{{ url_for('bugPage', bugId=bug['id']) }}"> <h2>{{ bug['title'] }}</h2> </a> <span class="badge text-bg-primary">{{ bug['type'] }}</span> <span class="badge text-bg-primary">{{ bug['created'] }}</span> <hr/> {% endfor %} {% endblock %} |
The url_for()bugPage to the url_for() function as a first argument. This is the name of the bugPage() view function and since it accepts a bugId argument, you give it the value bug['id'].
The links on the index page will now function as expected:

|
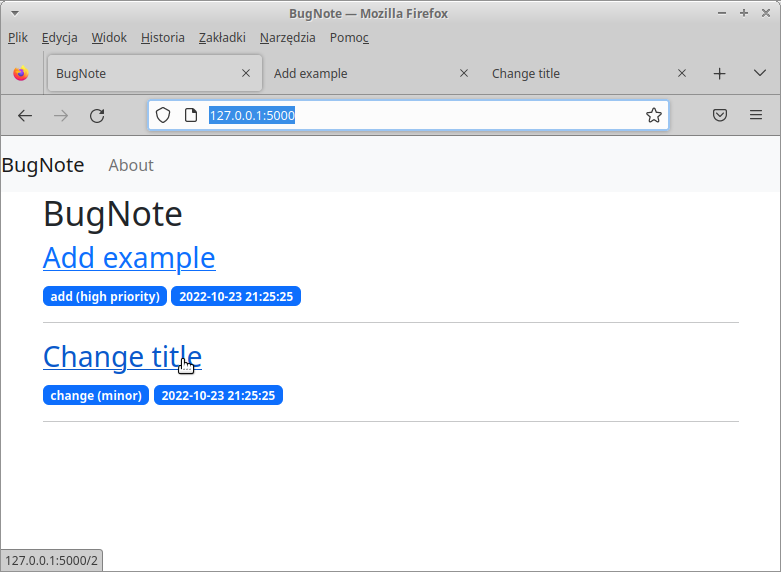
|
In this stage you will extend your code to allow adding data about new bugs. Because it is rather long section you will complete it in steps. First you will add form to enter required data and submit them to database. Next you will add a link to the navigation bar to have easy access to Add page and add functionality to display flashed messages.
Open the
main.py file for editing and change import from:
|
1 |
from flask import Flask, render_template |
to
|
1 |
from flask import Flask, render_template, request, url_for, flash, redirect |
You import:
- The global
requestobject to access incoming request data that will be submitted via an HTML form. - The
url_for()function to generate URLs. - The
flash()function to flash a message when a request is processed. - The
redirect()function to redirect the client to a different location.
The flash() function stores flashed messages in the client’s browser session, which requires setting a secret key. This secret key is used to secure sessions, which allow Flask to store information from one request to another. The user can access the information stored in the session, but cannot modify it unless they have the secret key, so you must never allow anyone to access your secret key.
To set a secret key, you’ll add a SECRET_KEY configuration to your application via the app.config object. In main.py, just after the line:
|
1 |
app = Flask(__name__) |
add:
|
1 |
app.config['SECRET_KEY'] = 'sessionSecretKey' |
Create a view function to render a template that displays a form you can fill in to create a new bug note. Add this new function to the main.py file:
|
1 2 3 |
@app.route('/add', methods=('GET', 'POST')) def addBug(): return render_template('add.htm') |
Next create the template file called add.htm inside your templates folder:
|
1 2 3 4 5 6 7 8 9 10 11 12 13 14 15 16 17 18 19 20 21 22 23 24 25 26 27 28 29 30 31 |
{% extends 'base.htm' %} {% block content %} <h1>{% block title %} Create a new bug note {% endblock %}</h1> <form method="post"> <div class="mb-3"> <label for="title" class="form-label">Title</label> <input type="text" name="title" placeholder="Bug title" class="form-control" value="{{ request.form['title'] }}"> </div> <div class="mb-3"> <label for="type" class="form-label">Type</label> <input type="text" name="type" placeholder="Bug type" class="form-control" value="{{ request.form['type'] }}"> </div> <div class="mb-3"> <label for="description" class="form-label">Description</label> <textarea name="description" placeholder="Bug description" class="form-control">{{ request.form['description'] }}</textarea> </div> <div class="mb-3"> <button type="submit" class="btn btn-primary">Save</button> </div> </form> {% endblock %} |
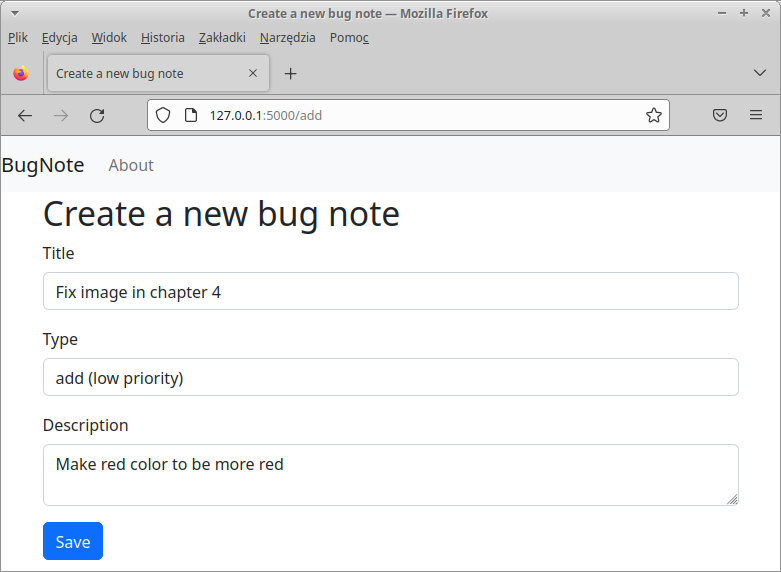
Use your browser to navigate to the /add route - you will see a Create a new bug note page with a fields for all required data:

|
This form submits a POST request to addBug() view function. At this moment, there is no code to handle a POST request in the function yet, so nothing happens after filling in the form and submitting it. To make it possible modify the addBug() view function to look exactly as follows:
|
1 2 3 4 5 6 7 8 9 10 11 12 13 14 15 16 17 18 19 20 21 22 |
@app.route('/add', methods=('GET', 'POST')) def addBug(): if request.method == 'POST': title = request.form['title'] typeOfBug = request.form['type'] description = request.form['description'] if not title: flash('Title is required') elif not typeOfBug: flash('Type is required') elif not description: flash('Description is required') else: connection = getDBConnection() connection.execute('INSERT INTO bugs (title, type, description) VALUES (?, ?, ?)', (title, typeOfBug, description)) connection.commit() connection.close() return redirect(url_for('index')) return render_template('add.htm') |
In the above code you use typeOfBug name instead of simply type because latter shadows build-in name.
Navigate to the /add route using your web browser and fill in the form with all required data. Once you submit the form, you will see the new bug listed on the index page:

|
|

|
Edit the base.htmfile by adding a new <li> tag preceding the About link inside the <nav> tag (I marked new text you should add with [Begin: new code] and [End: new code] "tags"; of course you shouldn't copy these tags):
|
1 2 3 4 5 6 7 8 9 10 |
[...] [Begin: new code] <li class="nav-item"> <a class="nav-link" href="{{url_for('addBug')}}">New bug</a> </li> [End: new code] <li class="nav-item active"> <a class="nav-link" href="#">About</a> </li> [...] |
Then add a new for loop directly above the content block to display the flashed messages below the navigation bar. These messages are available in the special get_flashed_messages() function Flask provides:
|
1 2 3 4 5 6 7 8 9 10 |
[...] <div class="container"> [Begin: new code] {% for message in get_flashed_messages() %} <div class="alert alert-danger">{{ message }}</div> {% endfor %} [End: new code] {% block content %} {% endblock %} </div> [...] |
After this change save and close the file. The navigation bar will now have a New bug item that links to the /add route.

|
If you try to add new bug with some informatin missing, you will see an error message:

|
Task for you: Modif the code so the type of bug is rather selected from drop-down list with predefined types then typed in text field.
You will add a new route to the
main.py file. View function associated with it will receive the ID of the bug that you want to update via URL in the format /update/BUG_ID with the bugId variable being the ID of the bug.
Add the following updateBug(bugId) view function to the main.py file. Because updating a bug is similar to creating a new one, so this view function will be very similar to the addBug() view function:
|
1 2 3 4 5 6 7 8 9 10 11 12 13 14 15 16 17 18 19 20 21 22 23 24 25 |
@app.route('/update/<int:bugId>', methods=('GET', 'POST')) def updateBug(bugId): bug = getBug(bugId) if request.method == 'POST': title = request.form['title'] typeOfBug = request.form['type'] description = request.form['description'] if not title: flash('Title is required') elif not typeOfBug: flash('Type is required') elif not description: flash('Description is required') else: connection = getDBConnection() connection.execute('UPDATE bugs SET title = ?, type = ?, description = ?' ' WHERE id = ?', (title, typeOfBug, description, bugId)) connection.commit() connection.close() return redirect(url_for('index')) return render_template('update.htm', bug=bug) |
Save and close the file, then create a new update.htm template with the following code:
|
1 2 3 4 5 6 7 8 9 10 11 12 13 14 15 16 17 18 19 20 21 22 23 24 25 26 27 28 29 30 |
{% block content %} <h1>{% block title %} Update "{{ bug['title'] }}" {% endblock %}</h1> <form method="post"> <div class="mb-3"> <label for="title" class="form-label">Title</label> <input type="text" name="title" placeholder="Bug title" class="form-control" value="{{ request.form['title'] or bug['title'] }}"> </div> <div class="mb-3"> <label for="type" class="form-label">Type</label> <input type="text" name="type" placeholder="Bug type" class="form-control" value="{{ request.form['type'] or bug['type'] }}"> </div> <div class="mb-3"> <label for="description" class="form-label">Description</label> <textarea name="description" placeholder="Bug description" class="form-control">{{ request.form['description'] or bug['description'] }}</textarea> </div> <div class="mb-3"> <button type="submit" class="btn btn-primary">Save</button> </div> </form> <hr> {% endblock %} |
When you save template you can navigate to the following URL to update the first post:
|
1 |
http://127.0.0.1:5000/update/1 |
You will see an Update "Add example" page:

|
Update the bug details, submit the form by pressing Save and make sure the post was updated:

|

|
The final step of updating is to add a link that points to the update page for each bug on the main index page. Make the following changes in the index.htm template file:
|
1 2 3 4 5 6 7 8 9 10 |
[...] <span class="badge text-bg-primary">{{ bug['type'] }}</span> <span class="badge text-bg-primary">{{ bug['created'] }}</span> [Begin: new code] <a href="{{ url_for('updateBug', bugId=bug['id']) }}"> <span class="badge text-bg-warning">Update</span> </a> [End: new code] <hr/> [...] |
and test if everything work as expected:

|
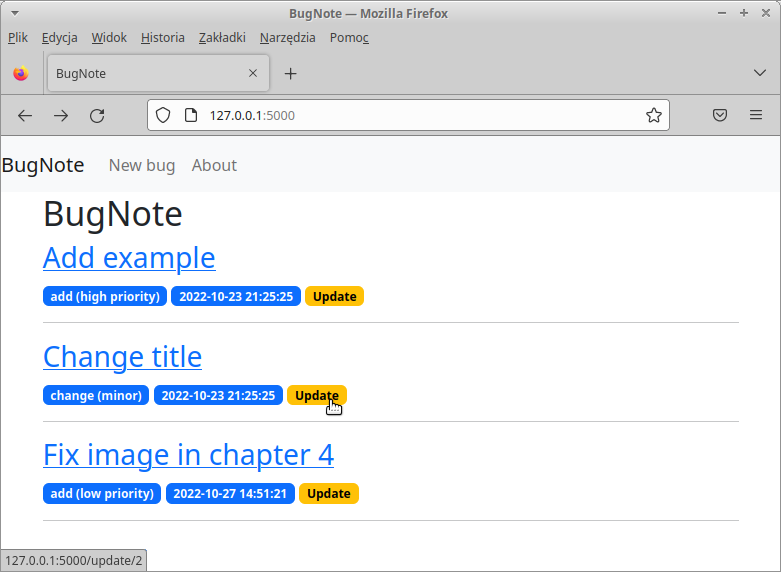
|
This is a last step to obtain fully functional applicartion to maintaint your bugs. First, you’ll add a new route of the form
/delete/ID that accepts POST requests, as you did to the updateBug(bugId) view function. Add the following code to the main.py file:
|
1 2 3 4 5 6 7 8 9 |
@app.route('/delete/<int:bugId>', methods=('POST',)) def deleteBug(bugId): bug = getBug(bugId) connection = getDBConnection() connection.execute('DELETE FROM bugs WHERE id = ?', (bugId,)) connection.commit() connection.close() flash('Bug "{}" was successfully deleted'.format(bug['title'])) return redirect(url_for('index')) |
As you may notice, this view function accepts only POST requests. In consequence when you navigate directly to the /delete/BUG_ID route on your browser, you will get an error because web browsers default request is GET. In your application you solve this problem via a form that sends a POST request passing in the ID of the bug you want to delete.
Note that in this case you don’t render a template file because you’ll just add a Delete button directly to the main index page.
Open the index.htm template file:
|
1 2 3 4 5 6 7 8 9 10 11 12 13 14 15 16 17 18 19 20 21 22 23 24 25 |
{% extends 'base.htm' %} {% block content %} <h1>{% block title %} BugNote {% endblock %}</h1> {% for bug in bugs %} <div class="mb-3"> <a href="{{ url_for('bugPage', bugId=bug['id']) }}"> <h2>{{ bug['title'] }}</h2> </a> <span class="badge text-bg-primary">{{ bug['type'] }}</span> <span class="badge text-bg-primary">{{ bug['created'] }}</span> <a href="{{ url_for('updateBug', bugId=bug['id']) }}"> <span class="badge text-bg-warning">Update</span> </a> </div> <div class="mb-3"> <form action="{{ url_for('deleteBug', bugId=bug['id']) }}" method="POST"> <input type="submit" value="Delete bug" class="btn btn-danger btn-sm" onclick="return confirm('Are you sure you want to delete this bug?')"> </form> </div> <hr/> {% endfor %} {% endblock %} |
You use the confirm() method to display a confirmation message before submitting the request.

|

|

|

|
Task for you: Change color of the flash message; you may refere to this page:
Task for you: Modif the app so you can manage predefined bug types.